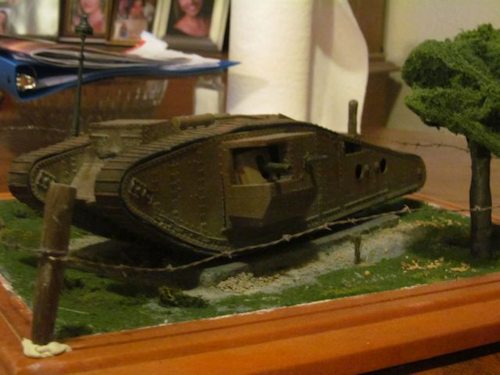
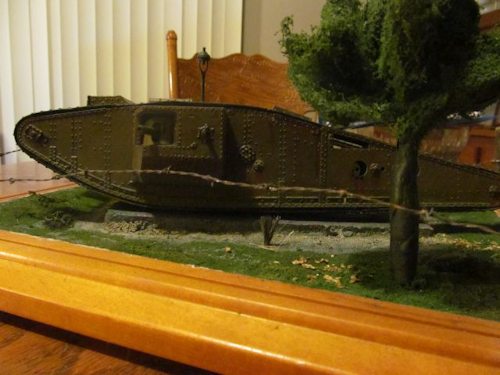
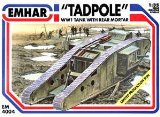
My diorama started with the 1/35 WWI Tadpole tank model by Emhar. The Tadpole was a modified Mark IV tank that had an extra long tail mounted to it to increase its trench crossing abilities. This proved unstable, however, and also made it more difficult to turn the tank, so it was abandoned. Very few prototypes were made and none survive today. This particular model does has some faults which have been discussed on various modeling websites, but I corrected them to the best of my ability.
So after assembly with super glue, I decided to paint this tank as if was a forgotten display vehicle in an armor park. I used Tamiya Khaki XF-49 for the base coat. There are differing opinions on what color the WWI British tanks were. Some say grey, some say khaki or brown, some people describe the camo pattern with four colors. I went with the khaki because there were examples of these painted in that scheme. After I applied this, I lightened and darkened the base paint and applied it in various random places to vary the look of the model. I continued the painting with dry brushing and washes to bring out details.
This was the first time I had decided to use washes on a large scale and I had some trouble controlling the water based acrylic wash, but I was able to practice and improve enough to finally get it to an acceptable level. A tip which helped a lot is to seal the base coat with a clear coat, so if you make a mistake, you can remove the last paint job and start again. I did this by spraying three coats of straight Future through my airbrush.
Now came the weathering stage. Since such a vehicle would be out in the weather constantly, especially the rain, I mixed up a nice rust tone with Tamiya XF10 Flat Brown and XF7 Flat Red. After mixing up the right tone, I applied it in different areas likely to have or hold rust. I ran it in streaks down the side of the tank, puddled it on the top of the tank in areas where pools of water would form and evaporate, streaked it down the back and sides of the model and dry brushed some areas that had gathered a lot of rust. Lastly, I applied a mixture of red and brown pastel dust in some areas to highlight the rust. Even though I tried to make it clear that this vehicle had seen its share of rainstorms, I subtly applied the rust so it would blend with the paint job. Maybe too subtle sometimes, but I believe that a good weathering job should blend in with the subject.
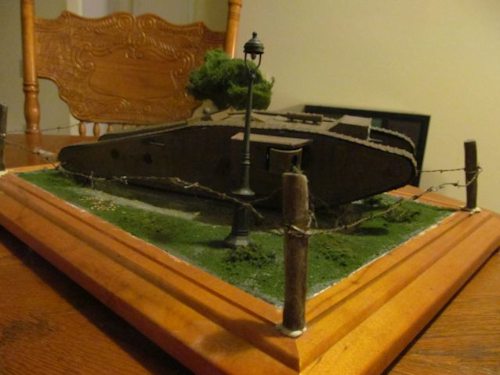
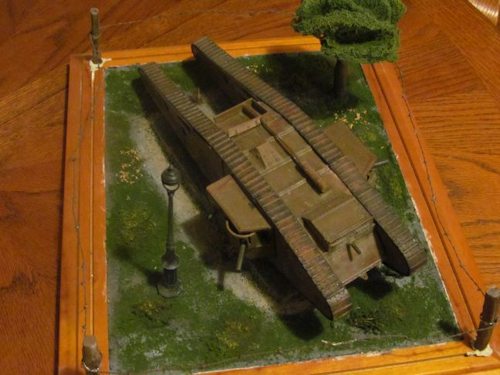
Model completed, I looked for a suitable base to mount it on. But I did not want to just mount it on a base by itself, so I decided to do a diorama. But what would be the theme? After considering some possibilities, I hit upon the idea of making an open air armor museum, with the tank as one of the exhibits. This decided on, I took out a base I had saved for just a use as this. It was the former bottom of a display case with a clear top and sides. I put the model on the base and sized it up. The model barely fit on the base, even diagonally, but there was just enough room and anyway the positioning did leave room on each side for landscaping and details. So I thought how I would build up the landscaping, placement of grass, bushes, trees, etc. I prepared the base by spraying it with three coats of clear lacquer, letting each coat dry thoroughly. This is to make sure no moisture would seep into the wood and warp it. This is important for the second part, when I mixed up a batch of Sculptamold with white glue, water and dishwashing liquid. This idea is from Shep Paine's book on making dioramas. The glue helps the Sculptamold adhere to the base, while the dishwashing liquid helps the mixture flow. Prior to applying the Sculptamold, I scored the top of the base with a hobby knife to help the Sculptamold adhere also.
Now to the fun part! I slathered the Sculptamold around and built up low and high spots in the park, paying special attention to the area the tank would sit. This is a low spot, so I had to make sure there were gentle slopes leading away.
The topography of the diorama is rough and uneven, as an outdoor area would be. Sculptamold good and dry, I airbrushed the groundwork with a combination of black, medium grey and light grey, in that order. This was to emphasize light and dark areas of the soil beneath the grass. I modeled the soil on the land here in my yard, which on the surface is greyish to white. While I applied the Sculptamold, I was careful to avoid the area where I wanted to place the tank. I wanted to place two big concrete slabs on the base for the tank to rest on, like you see in outdoor tank displays. I cut some from a block of Styrofoam and glued them down with white glue. Then I covered them with Testor's grey putty, let it dry and painted it like concrete. At this point, I wasn't sure how to go about making and painting these, so I winged it.
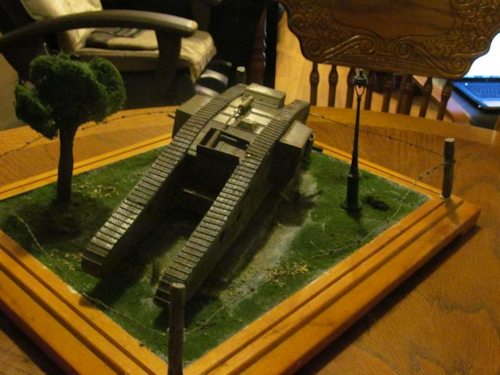
The next step for the groundwork is planning where the grass and other shrubbery goes. I thought a lot about this before I started painting the groundwork. This is important to visualize how all the components will come together. The area under the tank, the shallow depression, was strewn with sand and cat litter held down with watered down white glue and airbrushed with a yellowish color. This area has no grass because the shade of the tank prevents grass from growing there. The depression is also where all the water would gather after a storm. The feet of past visitors has worn away the grass around the tank. I sprayed watered down white glue on the areas to receive grass and sprinkled them with Woodland Scenics grass, followed with more water/white glue. In some spots I sprinkled a little more grass to build up the volume. The color of grass I chose was a medium green, but that was OK as I airbrushed it with darker and lighter tones after it had dried to get a real variation of tones like natural grass. I spent a lot of time studying grass and the colors it takes on under different lighting.
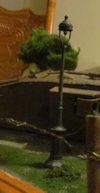
Now all along I was thinking of accessories to add to the park scene. I thought a lamp post would look cool so I dug one up from one of my old kits, assembled and painted it. Now for the perfect placement. I marked the location out along with the position of a tree directly opposite it. Both give the diorama some height and visual variety. I made the tree from putty molded around a core of fine wire, with the top of the wires bent in different directions. I scraped the putty with a fine wire tool, to give some texture, and then painted it. Next I covered the top of the tree in super glue and bits torn off from a floor buffing pad. I then airbrushed the top with a medium green color, varying between light and dark shades. Let everything dry and a tree is born. I drilled out the bottoms of both tree and lamp with a pin vice and inserted some fine wire in order to mount them when the dio was nearly finished.
Moving on, I took some lichen and put them here and there for bushes and planted the clumps of weeds, which I made from the bristles of an old paintbrush. I secured them both with white glue. All during this process I kept fussing at different details and double checking everything, but this is all part of composing a diorama. You want it to look natural despite the many changes you are likely to make.

The next to the last step was the making and placement of the wooden posts and the barbed wire. These are not intended to be in scale, but I had four empty ugly holes on the corners of the base and wanted some sort of enclosure for the diorama. Also, it it reminiscent of the battlefields these tanks used to fight in. I made the posts from putty and scored them like I did the tree trunk. let them dry and painted them with a base coat, highlights and washes. I then drilled out the bottoms for the wire to secure them. I filled the holes with the same putty and inserted the posts before it set up. I made the barbed wire by twisting a strand of fine wire folded in half together, then wrapped another strand along the wire to make the barbs. I dabbed some super glue at each intersection and let it dry. After that, I snipped the excess wire off, painted and highlighted.
This was a long projects to complete, bit was very creative and fun. Planning out the details and figuring out how to do them was tr most fun part. Hope you enjoy it!
It is available on amazon.com:
EMHAR "Tadpole" WW1 Tank With Rear Mortar 1:35th
EMHAR makes a tadpole variant of the Mk IV male (cannon version). Even though tadpole extension was mainly built for the Mk V, the testing tanks were the Mk IV variant. The kit is basically a Mk IV male with an extra spruce of parts for the tail, and more tracks. The kit also comes with a mortar on the back of the tank!
 AMACO Sculptamold Modeling Compound, 3-Pound, White AMACO Sculptamold Modeling Compound, 3-Pound, White

Do you like making projects and exploring a variety of hobbies?
Sign up for my free newsletter. I give you regular updates on hobbies and projects you can make. it is totally free and I don't share your email with anybody.
|