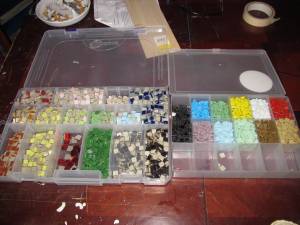
 The first thing you need to do is organize your mosaic tiles by color. Assuming you're going to be using more than one color for your mosaic, it is best to do this using something like a bead organizer or many small containers, so you have them all in one place. If you have many different types of tiles, such as ceramic, glass and plastic, then don't mix the types, even if they're the same color. Different types of tiles produce different effects visually, some stain while others do not, some are significantly shorter than others in terms of height, and some simply are not as easy to manipulate with a pair of tile clippers as others. The first thing you need to do is organize your mosaic tiles by color. Assuming you're going to be using more than one color for your mosaic, it is best to do this using something like a bead organizer or many small containers, so you have them all in one place. If you have many different types of tiles, such as ceramic, glass and plastic, then don't mix the types, even if they're the same color. Different types of tiles produce different effects visually, some stain while others do not, some are significantly shorter than others in terms of height, and some simply are not as easy to manipulate with a pair of tile clippers as others.
The next step is to locate your source image. We chose a dragon drawing we found from Google.com with no attributed artist.
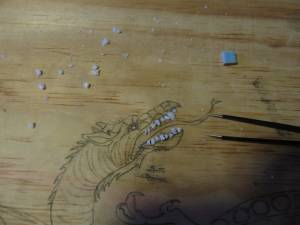
 Next, using carbon paper, a ruler and pencil (to ensure the dragon is straight) transfer your image onto the MDF board. We could not locate our carbon paper. Carbon paper is transfer paper. If you do not have any, there is a relatively easy way to make some on the fly: Next, using carbon paper, a ruler and pencil (to ensure the dragon is straight) transfer your image onto the MDF board. We could not locate our carbon paper. Carbon paper is transfer paper. If you do not have any, there is a relatively easy way to make some on the fly:
Using a utility knife, we shaved down the coating on an 8B graphite stick. We then flipped over our source image and began to vigorously and thoroughly shade the entire back side of the image.
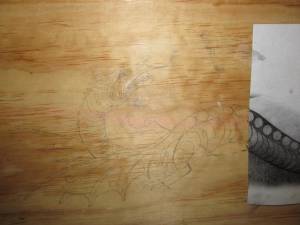 We flipped over the source image and taped it to the plywood surface with painter's tape. Then, we took a very sharp pencil and traced directly over the dragon. In doing this, anything we traced over was transferred onto the wood. The photos presented throughout this tutorial feature the mosaic design being completed on plywood. Because it was warped, there were many times during the month-long execution of this project in which we had to screw this plywood down onto our work table to help straighten it out. Furthermore, plywood is NOT recommended as a surface material for any mosaic. It is porous and thin. We would absolutely use the MDF board if we were to do this over again. We flipped over the source image and taped it to the plywood surface with painter's tape. Then, we took a very sharp pencil and traced directly over the dragon. In doing this, anything we traced over was transferred onto the wood. The photos presented throughout this tutorial feature the mosaic design being completed on plywood. Because it was warped, there were many times during the month-long execution of this project in which we had to screw this plywood down onto our work table to help straighten it out. Furthermore, plywood is NOT recommended as a surface material for any mosaic. It is porous and thin. We would absolutely use the MDF board if we were to do this over again.
Once your entire image is transferred onto the wood, you need to seal the wood by applying a thin layer of basic Elmer's glue (also known as PVA adhesive, which we will call it for the rest of the tutorial). This is very simple, just use a large paintbrush and spread a thin layer of glue completely over your whole wooden surface. This will seal the outline of your drawing to the board. It should be noted that in most cases mosaics are not free-hand like this one was, but rather very specifically mapped out into grids. The forms in mosaics are often reduced to simpler shapes to work better with the square tiles used. Furthermore, the background rows and columns as well as the specific shapes needed in the detail work are predetermined with a ruler. Stormthecastle did not approach this mosaic in that way because the shape of the dragon was so supine and organic. This is recommended for those with a background in visual art, but not recommended to those with no formal training whatsoever.
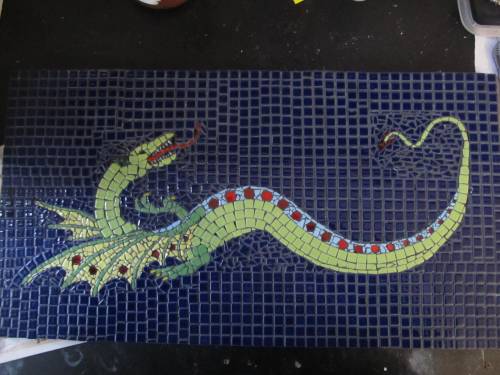
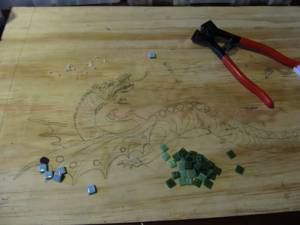 You're ready to start working out your color scheme for your dragon and begin shaping tiles using your cutting tool. We decided on lime green ceramic tiles for the body and white plastic tiles for the teeth because of the unique shards plastic tiles create when broken against the grain with the clipper. You're ready to start working out your color scheme for your dragon and begin shaping tiles using your cutting tool. We decided on lime green ceramic tiles for the body and white plastic tiles for the teeth because of the unique shards plastic tiles create when broken against the grain with the clipper.
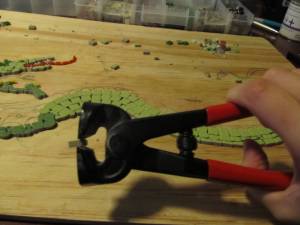
 Every part of the design consists of following the exact same steps the whole time: find a color scheme, and, exactly like a puzzle, cut and shape and smash your tiles until they generally mimic the shapes you need to guarantee that your image is going to read clearly to the viewer’s eye. Make sure you are using tweezers to handle your tiles! They offer the absolute best maneuverability and control. Once everything looks right, glue them down with PVA adhesive. They don’t have to fit together like bricks. You should leave space between them (about 1/8”) so the grout can settle in the cracks later in the project. Ultimately do not be afraid to make mistakes, the mosaic is a surprisingly forgiving medium if the basic steps are followed correctly. Remember that the shape of each individual tile is NOT as important as the implied overall shape many pieces together will establish! In this image, we give you an example of how simply smashing a tile into random shapes can be a real benefit to your design. Remember, not every shape has to be precise. They can be as wild and disjointed as needed. Also, ceramic tiles break into more controlled shapes without shattering unlike plastic and glass tiles. Every part of the design consists of following the exact same steps the whole time: find a color scheme, and, exactly like a puzzle, cut and shape and smash your tiles until they generally mimic the shapes you need to guarantee that your image is going to read clearly to the viewer’s eye. Make sure you are using tweezers to handle your tiles! They offer the absolute best maneuverability and control. Once everything looks right, glue them down with PVA adhesive. They don’t have to fit together like bricks. You should leave space between them (about 1/8”) so the grout can settle in the cracks later in the project. Ultimately do not be afraid to make mistakes, the mosaic is a surprisingly forgiving medium if the basic steps are followed correctly. Remember that the shape of each individual tile is NOT as important as the implied overall shape many pieces together will establish! In this image, we give you an example of how simply smashing a tile into random shapes can be a real benefit to your design. Remember, not every shape has to be precise. They can be as wild and disjointed as needed. Also, ceramic tiles break into more controlled shapes without shattering unlike plastic and glass tiles.
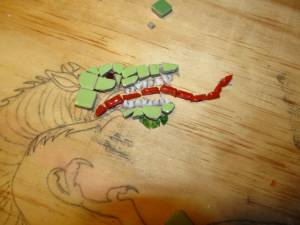 Beware of a drastic height difference in tiles (as in this detail shot of the teeth vs. the rest of the head), because it could potentially cause a lot of trouble when you’re grouting. You might stain tiles that are too short with grout, or they may get completely lost in the mosaic because they’re being covered up. Also, make sure your tile pieces have a solid flat edge on the bottom for gluing. You can test this by using the tweezers to get the piece to stand up independently. If a piece of tile can stand up independently, it has sufficient flat surface on the base, meaning it will take to glue well and won’t break off the board when you’re grouting it or cleaning off the grout at the end. Beware of a drastic height difference in tiles (as in this detail shot of the teeth vs. the rest of the head), because it could potentially cause a lot of trouble when you’re grouting. You might stain tiles that are too short with grout, or they may get completely lost in the mosaic because they’re being covered up. Also, make sure your tile pieces have a solid flat edge on the bottom for gluing. You can test this by using the tweezers to get the piece to stand up independently. If a piece of tile can stand up independently, it has sufficient flat surface on the base, meaning it will take to glue well and won’t break off the board when you’re grouting it or cleaning off the grout at the end.
 When cutting tiles into circles, use the thinnest edge of your tile clipper and literally shave off the smallest pieces you can at a time, going around and around the edges until you’ve worn down the shape into a circle. It is possible to be extremely precise doing it this way, and you are able to get a wide range of sizes. When cutting tiles into circles, use the thinnest edge of your tile clipper and literally shave off the smallest pieces you can at a time, going around and around the edges until you’ve worn down the shape into a circle. It is possible to be extremely precise doing it this way, and you are able to get a wide range of sizes.
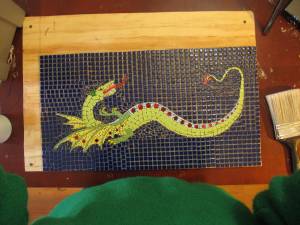 It might have taken a month or more, but you’re finally ready to grout! Once your final pieces of tile are glued down, it’s generally a good idea to wait about 24 hours before this next step. Your color scheme is going to affect the color of grout you chose. Since our dragon has white fangs and a navy blue background, we decided to go with black grout. It might have taken a month or more, but you’re finally ready to grout! Once your final pieces of tile are glued down, it’s generally a good idea to wait about 24 hours before this next step. Your color scheme is going to affect the color of grout you chose. Since our dragon has white fangs and a navy blue background, we decided to go with black grout.
 Part 2 of the Dragon Mosaic Tutorial Part 2 of the Dragon Mosaic Tutorial
 Beginner's Guide to Mosaic Beginner's Guide to Mosaic
This is the exact book that I bought to get me started on Mosaic Making.
Eight colorful, innovative, easy-to-follow projects show the beginner how to create a range of mosaics, from a colourful table top and crazy-paving flower pots to a beautiful clock embellished with beads and stunning bathroom panels. Each project is accompanied by a design template, and clear step-by-step photographs. A selection of striking mosaic items are included to inspire readers to create their own original decorative objects, three dimensional forms and panels. This book offers a rich source of practical advice and inspiration-and all the information you need to get started!
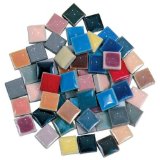 Jennifer's Mosaics 5-Pound 3/8-Inch Deco Ceramic Mosaic Tile, Assorted Colors Jennifer's Mosaics 5-Pound 3/8-Inch Deco Ceramic Mosaic Tile, Assorted Colors
And this is the bag of tiles I ordered to get started. You get a nice assortment of colors. You can see by the mosaic though that I had to order more blue for the background.
|


