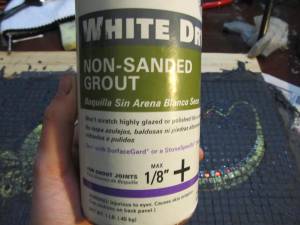
 To mix black grout first cover your entire work area with a tarp or old newspapers to catch the mess. You're going to want to use some rubber gloves and a dust mask for this step. Take your non-sanded grout and pour it in a large bowl. Because there is no right or wrong amount of grout needed, you’ll have to eyeball the proper amount to use. That being said, simply add a good amount of grout (keeping in mind it will thicken with water) and slowly pour in a little bit of water at a time, mixing the substances together as evenly and smoothly as possible. Good quality grout and a patient mixing method should have very few (if any) clumps or air bubbles, so it’s best to use your hands to stir, that way you can feel the consistency. You’re aiming to have enough grout to cover your entire project with the consistency of something like peanut butter. For this part, again, you MUST use gloves and a dust mask! YOU DO NOT WANT TO INHALE WATER SOLUBLE CEMENT POWDER! To mix black grout first cover your entire work area with a tarp or old newspapers to catch the mess. You're going to want to use some rubber gloves and a dust mask for this step. Take your non-sanded grout and pour it in a large bowl. Because there is no right or wrong amount of grout needed, you’ll have to eyeball the proper amount to use. That being said, simply add a good amount of grout (keeping in mind it will thicken with water) and slowly pour in a little bit of water at a time, mixing the substances together as evenly and smoothly as possible. Good quality grout and a patient mixing method should have very few (if any) clumps or air bubbles, so it’s best to use your hands to stir, that way you can feel the consistency. You’re aiming to have enough grout to cover your entire project with the consistency of something like peanut butter. For this part, again, you MUST use gloves and a dust mask! YOU DO NOT WANT TO INHALE WATER SOLUBLE CEMENT POWDER!
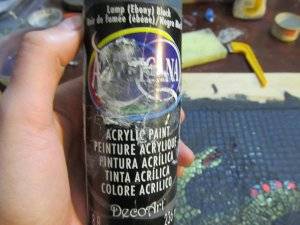
Once the grout has been mixed with water, you can remove your dust mask. Take any color acrylic paint at this point (we used black) and add it to the grout. Add as much as you need to achieve the color you desire. Remember that the grout WILL dry lighter.
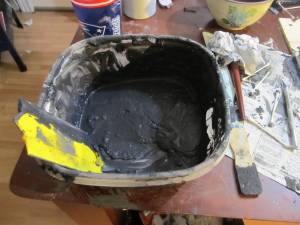 Mix it all together, it should look something like this. Mix it all together, it should look something like this.
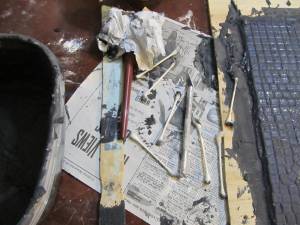 Here is a detail shot of possible tools you might need when grouting: Paint stirring stick, an exact-o knife to dig out buried tiles, and several cotton swabs as well as a paper towel or two to scrub the grout off any areas where staining or oversaturation have occurred. (NOT PICTURED: basic grout spreader) Here is a detail shot of possible tools you might need when grouting: Paint stirring stick, an exact-o knife to dig out buried tiles, and several cotton swabs as well as a paper towel or two to scrub the grout off any areas where staining or oversaturation have occurred. (NOT PICTURED: basic grout spreader)
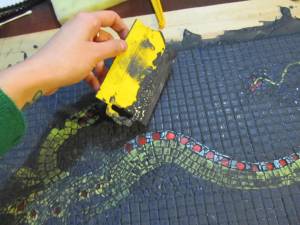 When you’re done mixing in the grout color, give it about five minutes to sit. It lets the mixture settle into itself. After five minutes, begin applying the grout onto your mosaic in big globs. Do not be shy. There are a number of methods used to spread the grout around used by mosaic artisans. You can use paint brushes, grout spreaders, towels, etc. The tools we used were a grout spreader, a notched spreader (for which we found little use), and cotton swabs (to smear the grout deep in the recesses of the teeth/mouth). It is super important to remember to spread the grout out in 360 degrees. Smooth it out from every angle to ensure the most even coverage. Areas that have trouble absorbing the grout can be coaxed along by manually grinding the grout into the cracks using your gloved fingertips. This process is relatively quick and should not be done in a leisurely manner. Time is of the essence because you want the grout to dry in unison. For best results and fastest drying time, use a grout spreader to remove as much excess grout from the top of the mosaic as possible. When you’re done mixing in the grout color, give it about five minutes to sit. It lets the mixture settle into itself. After five minutes, begin applying the grout onto your mosaic in big globs. Do not be shy. There are a number of methods used to spread the grout around used by mosaic artisans. You can use paint brushes, grout spreaders, towels, etc. The tools we used were a grout spreader, a notched spreader (for which we found little use), and cotton swabs (to smear the grout deep in the recesses of the teeth/mouth). It is super important to remember to spread the grout out in 360 degrees. Smooth it out from every angle to ensure the most even coverage. Areas that have trouble absorbing the grout can be coaxed along by manually grinding the grout into the cracks using your gloved fingertips. This process is relatively quick and should not be done in a leisurely manner. Time is of the essence because you want the grout to dry in unison. For best results and fastest drying time, use a grout spreader to remove as much excess grout from the top of the mosaic as possible.
 Make sure to coat all the edges with grout as well. Make sure to coat all the edges with grout as well.
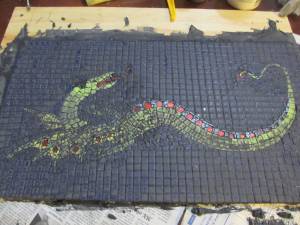 Once you feel confident with your grout, leave it alone for 10-20 minutes drying time or until the grout on top of the tiles is dusty. After this, use a regular kitchen sponge and a bowl of warm water to gently wipe down the surface of the mosaic. You might need to clean it more than once to get rid any residue left behind, and that’s okay. Once you feel confident with your grout, leave it alone for 10-20 minutes drying time or until the grout on top of the tiles is dusty. After this, use a regular kitchen sponge and a bowl of warm water to gently wipe down the surface of the mosaic. You might need to clean it more than once to get rid any residue left behind, and that’s okay.
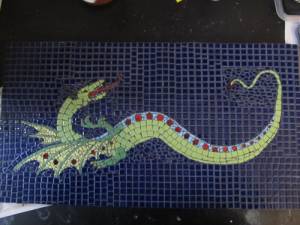 In about 24 hours, you should have a completed, fully dried, beautiful mosaic! Happy crafting, you’ve done a wonderful job! If you notice some imperfections in your grouting, that’s okay, so did we. We noticed some air bubbles that surfaced and left porous marks between some of the tiles. We also notices patches where the non-sanded grout was not properly broken down and mixed, causing minor white patches to appear amidst the dark, dark grey our grout dried into. We also noticed an area where it appeared as though a tile came loose and was missing. This area was bald to the wood and stuck out like a sore thumb. Here are a few photos and explanation of that problem being touched up with simple black acrylic paint and an angled shader brush. In about 24 hours, you should have a completed, fully dried, beautiful mosaic! Happy crafting, you’ve done a wonderful job! If you notice some imperfections in your grouting, that’s okay, so did we. We noticed some air bubbles that surfaced and left porous marks between some of the tiles. We also notices patches where the non-sanded grout was not properly broken down and mixed, causing minor white patches to appear amidst the dark, dark grey our grout dried into. We also noticed an area where it appeared as though a tile came loose and was missing. This area was bald to the wood and stuck out like a sore thumb. Here are a few photos and explanation of that problem being touched up with simple black acrylic paint and an angled shader brush.
|


