Making the Marionette
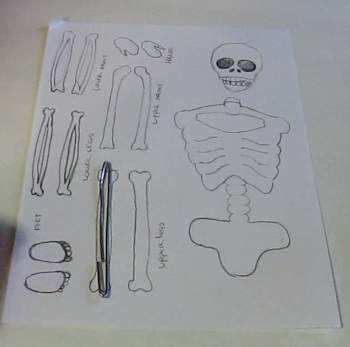
Print up the template. It shows you the shape and size of all the bone pieces of the skeleton. For the eight long bones (arms and legs) you bend a piece of wire like you see in the picture. And make each of these a little bit longer than the bone size. This is so the wire will stick out and we can use it to assemble the marionette together.
Almost any kind of wire will do. 16 gauge is about right. It just needs to act as an armature within the bones and have hoops that stick out each end of the bones.

Now use some kind of an oven baked clay to shape the bones right on those wires you made.
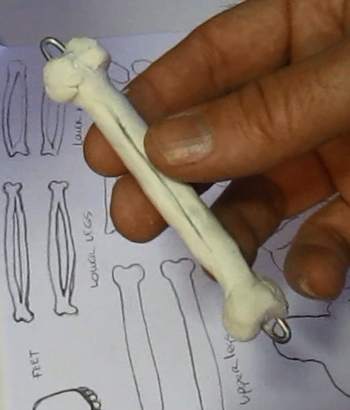
Just like this! The first bone is done. Notice how there is a wire hoop sticking out each end. We need that. And see the crisp line down the middle? I did that with an xacto knife. So, use any tools you need to get the bone shapes the way you want them.
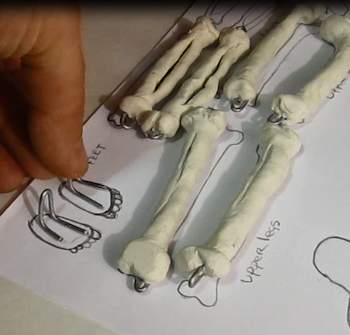
This is how to shape the wires for the feet. Do something similiar for the hands. And you can see that I have six of the long bones done.
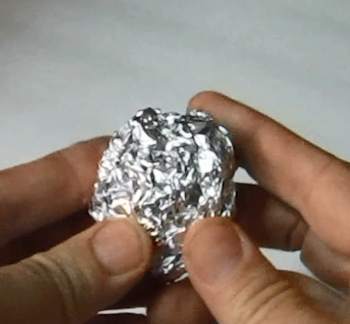
Now let's make the head. We first start with a ball of aluminum foil. This will make it quicker and easier to harden and it saves you a lot of the clay. Shape it roughly into the shape of a skull.
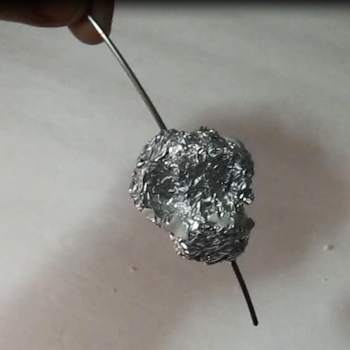
Poke a wire through that head from top to bottom and form hoops with the wire both top and bottom.
In this picture I haven't yet formed the hoops.
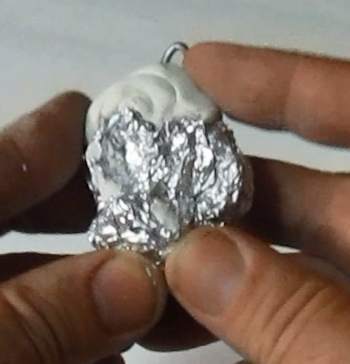
Now tear off bits of clay and apply them to the skull slowly shaping it into a skull. Leave the top and bottom wire hoops exposed.
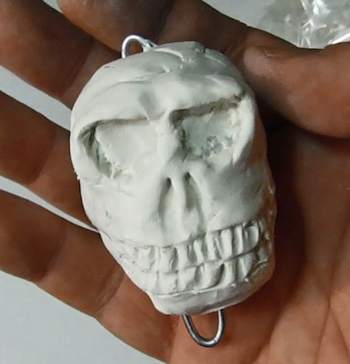
And that's it! The skull is shaped. Notice the wire hoops are exposed. We need those later.
If you do this project be sure to send me a picture of the skull you make. This is my favorite part.
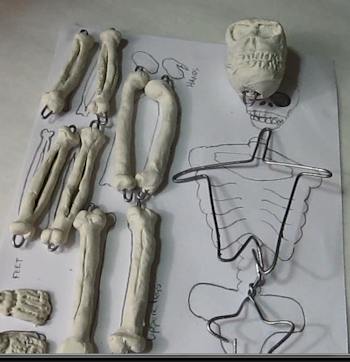
For the Torso create a wire armature that looks like this. Notice the hoops that stick out at the shoulders, hips and the neck.
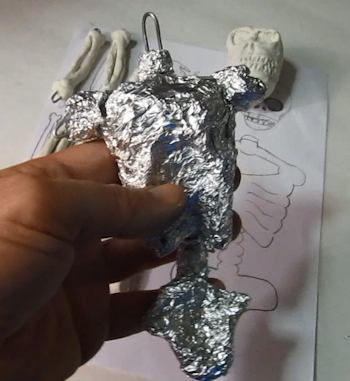
Now fill in the torso with foil just like you did with the skull. Notice the shoulders, neck and backbone.
This whole thing has a nice shape to it. I like it!
 okay! Let's clay it up. okay! Let's clay it up.
 New: How to Set up a Goldfish Tank New: How to Set up a Goldfish Tank
I got myself three adorable goldfish. I am obsessed with them! Here is a tutorial on what to get and what to do if you want an easy start with an aquarium. How to Set up a goldfish aquarium |
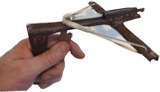 Make a Mini Crossbow Make a Mini Crossbow
This is a powerful little crossbow that fires straws! Easy to make and whole lot of fun. Make a mini crossbow |
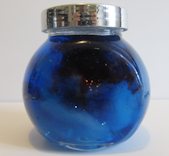 Make a Nebula in a bottle Make a Nebula in a bottle
A nebula is a beautiful object in the night sky. And you can have one on your bureau or desk. I show you how to make one with a few around the house items. Make a nebula in a bottle |
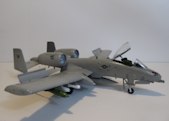 Make the A-10 Warthog Plastic Model Make the A-10 Warthog Plastic Model
This is a 1:48 Scale Revell model. It is a good size with some weight and detail. I take you through the steps to making this model and I have a video to go with it. Make the A-10 Warthog |

Do you like making projects and exploring a variety of hobbies?
Sign up for my free newsletter. I give you regular updates on hobbies and projects you can make. it is totally free and I don't share your email with anybody. |


