Hi, Thanks for visiting my website. My name is Will and if you have questions
or would like to
contribute projects or ideas you can contact me
Make the Legolas Elven Swords
This is a tutorial on how to make the Legolas elven swords from Lord of the Rings.
It is an easy project and all you need is a piece of foamboard (or cardboard) and a little bit of some kind of foam or styrofoam for the handles.
There are a lot of different options for painting and decorating it and we will cover some of these options.
But, no reason why you can't get creative and have some fun by decorating and painting these swords any way you want!
The sword blade and handle are in a template right here that you can print out and use to make your swords: Legolas Swords
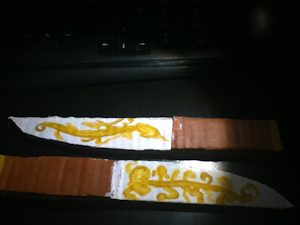
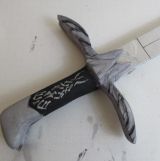
Can you make these legolas swords? You sure can! Here is a picture of the swords that Job made. My thanks go to him for sending in the pic!
How to make Legolas' Swords from LOTR
• The first thing you need to do is find yourself a source image. A quick search on google should yield ample results. Any one that you enjoy is fine. In this project, as with any project in which you are searching for a source image, the best thing you can do is to try to find your subject from as many angles as possible. This enhances your concrete understanding of its three-dimensional form. Don't worry if you can't find a variety of angles, STC was not able to find very many ourselves.
• We selected our sword image and studied it carefully, rendering the shape on a piece of newsprint paper. Now, there are two ways you can go about using your source image. If you have a steadier hand or would prefer to draw it out (STC used this method), you can render your sword on tracing paper, newsprint paper, etc. Really any paper will do. The other option you have is to print out the source image large enough to fit the size of the sword you want to make and trace it directly from there onto your foam board. If you choose to do the latter, disregard steps 3 and 4.
Since we went about this by hand, this step-by-step tutorial will focus on our approach more than alternative approaches.
• Now, as we stated before STC used newsprint paper and drew on our Legolas Sword shape. From there we outlined the drawing in a bold marker and flipped over the paper. When the paper is flipped, you should see the inverted image you've drawn through the paper. Trace this with a very dark graphite pencil of some kind, preferably a B or "soft" type of pencil. These will work best because the soft graphite blends and smears onto other surfaces. This is beneficial for our swords.
• Next step is to take your default shape and begin tracing it onto a piece of foam board. We used standard 20"x30" foam board, 3/16" thick for this project. This is durable yet easy to work with. When tracing it, place the graphite side down onto the foam board and with a sharp writing utensil simply trace the image firmly. Essentially, this works just like contact or transfer paper. Because we coated our other side with graphite, the sword shape will appear on the foam board even though you have not drawn directly onto it. You will need to trace out three swords on your foam board. These three layers will later be glued together to create a sturdy structure that will not bend or warp. Well done.
Note: You can print up our template, cut out the pieces and assemble them together to make the sword shape. Then you can use this to trace the sword shape onto foamboard. The template is here (pdf)
• On our foam board, we were able to fit all three outlines of the sword shape onto one piece. You don't need to squeeze them in, they should fit quite comfortably side by side with plenty of room to spare. This is good if you're looking to get as much as you can out of your board. Once you have three images traced, you're ready to move onto the next step.
• It's time to begin cutting out our shapes. STC prefers a standard size exacto knife with a size 11 blade. You can use a box cutter, a utility knife, or a standard sized bare razor blade to do this. Scissors are not recommended! Do not use scissors, you will crack, bend and possibly snap your foam board. (It will be a headache!) With your cutting implement of choice, carefully cut out the three pieces.
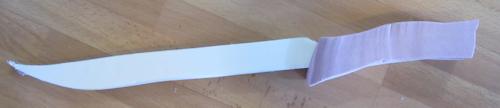
• Once the three pieces are cut out, you're ready to glue. (Don't worry if all three pieces are not 100% identical, as long as they're almost the exact same shape you'll be fine. These are just the rough shape and will be smoothed out later in the process.) We used regular hot glue and would not recommend anything else for binding the layers together. Glue one piece, stick another piece of the sword on top of it, and do the same thing to your second piece. Finally all three pieces will be adhered to one another, and you have yourself the basic frame for your Legolas Swords. Good job!
• The next step is to create a handle out of foamular. We used Owens-Corning brand 1" thick foamular which can be purchased at any local hardware store, Lowe's or Home Depot. STC used a hot wire foam cutter to cut out our shape. The best thing to do here is to cut out a much larger piece of foamular than you're going to need for your handle. This gives you plenty of room on all sides of the foam to sculpt out the finer form later.
• If you don't have a hot wire foam cutter, a very thin saw will work wonders.
• Once you have your block cut out, cut it in two length-wise. Now you have two half-inch thick pieces of foamular of the same size and shape. These will make up your handle.
• Glue the foamular onto your foam board, the best method is to center your foamular over the foam board handle. You will have a lot of extra foamular. This is what you want.
• Now the fun part starts. You are ready to start sanding. STC used two types of sandpaper for this project. By hand, we used loose sheets of p400 and p80 sand paper. P80 is a rougher grit that will help you smooth off any rough edges from your foam board blade. Essentially this process is akin to sharpening a knife. The p400 grit is a lot smoother and is perfect for buffing out any tiny areas or removing frayed paper from the blade. When you have reached the desired shape and smoothness of the blade, you can begin working on the handle.
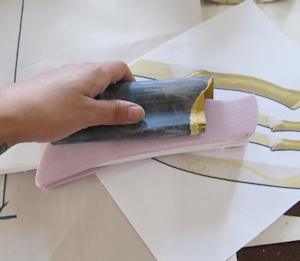
• Making the handle is quite a bit of work. We highly recommend working outside if possible and certainly wearing a respiratory mask and goggles if you have any. The foam dust will go everywhere and will absolutely get into your nose and eyes, so please be aware.
• The best bet for your handle is to once again refer to your source image. We recommend using a pencil to draw in the areas needing curvature, mapping out precise angles, etc. on your foamular. This way you have a solid representation of the areas you need to sand down and exactly where to do it.
• Next step, as you probably guessed, is to take the p80 grit sand paper and sand, sand, sand the foamular down. This will require a bit of patience and persistence but pays off wonderfully in the end. As you sand, a good frame of reference for how much more sanding needs to be done is by holding the sword in your hand. When the foamular fits comfortably into your palm, is not bulky, and has the correct shape, you're ready to start buffing out the finer details with your p400 grit sand paper.
• If your foamular is ripping off in small chunks with the p80 grit, do not worry. The p400 grit is going to buff all the surfaces down and smooth them out. STC ran into the same situation and found it had no negative effect on the final outcome of the piece.
• The main point in sanding is to reduce as much of the excess foamular as possible, leaving only what little extra you need to create an ornate and impressive looking handle. Not only should you be sanding for the shape, but with the p400 grit, you can actually trim the thickness of your foamular without damaging it at all. STC started with two ½" pieces of foamular and finished with two ¼" thick pieces as the final product.
• After a bit of sanding, you should find yourself holding a completed sword. You have successfully finished your handle, you have smoothed out your blade, and you've done a great job. Congratulations! It's time to start painting!
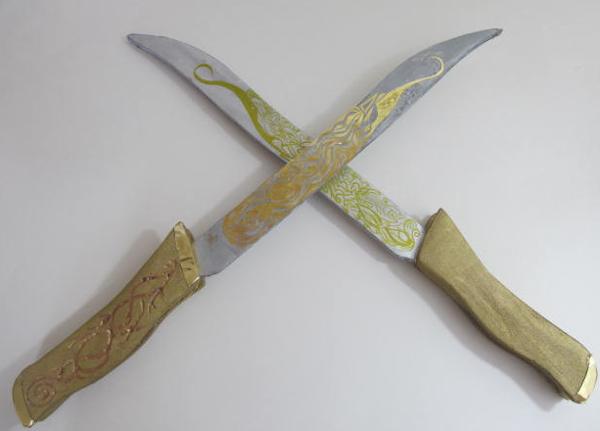
• Make sure to brush off any foam dust from your sword before you begin painting. That is always a good rule of thumb: apply your decorations to clean surfaces. For our blade, we used Testor brand Silver Metallic Enamel. The results are excellent and mimic fresh steel perfectly. With any brush of any size, simply paint the entire blade, all sides, with silver enamel. Allow for about ten minutes drying time and you're ready to paint your handle. For our handle, we used Partha brand Gold Metallic enamel. The metallic effect will be diminished greatly by the absorbency of the foamular, but that is a plus. Because of that, the intricate Elven vine patterns winding up the handle and along the length of the blade will stand out immensely.
(Blades are silver and handles are gold)
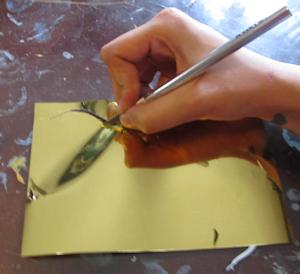
You have lots of options when it comes to decorating the handles and blades of your swords. One great thing is cutting curls and curves out of gold paper. We used origami foil paper. You have to experiment with different types of adhesives when doing this. Some don't work so well and others will eat the foam or distort the painted colors. Mod Podge usually is a good choice for this.
I love elmers foam board, and this has light grid lines on it .
MORE PROJECTS
Make the Assassin's Creed Altair Sword
Easy project that looks great. Just need some foam and a single piece of foamboar. I have the template you can print up and make. Make the Altair sword from Assassin's Creed
Uruk Hai Scimitar
This is the sword that the Uruk Hai wielded in the Lord of the Rings Movies. Easy to make and all you need is a sheet of foam board or cardboard. Download the package and print it up. Make an Uruk Hai Scimitar
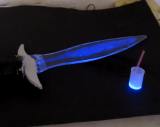
Make a Glowing Sword -Sting from Lord of the Rings
Fun little project that uses a glowstick and a couple of pieces of lexan plastic. It really glows. Make the Glowing Sting Sword
Do you like making projects and exploring a variety of hobbies?
Sign up for my free newsletter. I give you regular updates on hobbies and projects you can make. it is totally free and I don't share your email with anybody.


 C
C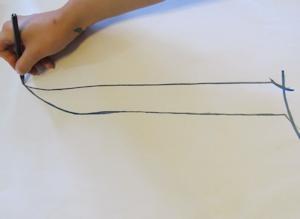 • Now, as we stated before STC used newsprint paper and drew on our Legolas Sword shape. From there we outlined the drawing in a bold marker and flipped over the paper. When the paper is flipped, you should see the inverted image you've drawn through the paper. Trace this with a very dark graphite pencil of some kind, preferably a B or "soft" type of pencil. These will work best because the soft graphite blends and smears onto other surfaces. This is beneficial for our swords.
 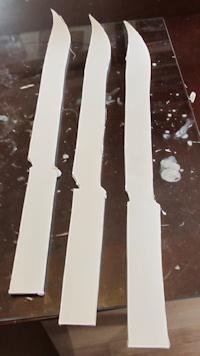 • Once the three pieces are cut out, you're ready to glue. (Don't worry if all three pieces are not 100% identical, as long as they're almost the exact same shape you'll be fine. These are just the rough shape and will be smoothed out later in the process.) We used regular hot glue and would not recommend anything else for binding the layers together. Glue one piece, stick another piece of the sword on top of it, and do the same thing to your second piece. Finally all three pieces will be adhered to one another, and you have yourself the basic frame for your Legolas Swords. Good job!
 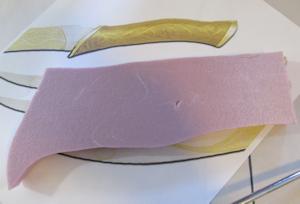 • The next step is to create a handle out of foamular. We used Owens-Corning brand 1" thick foamular which can be purchased at any local hardware store, Lowe's or Home Depot. STC used a hot wire foam cutter to cut out our shape. The best thing to do here is to cut out a much larger piece of foamular than you're going to need for your handle. This gives you plenty of room on all sides of the foam to sculpt out the finer form later.
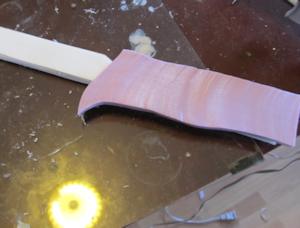
 • Next step, as you probably guessed, is to take the p80 grit sand paper and sand, sand, sand the foamular down. This will require a bit of patience and persistence but pays off wonderfully in the end. As you sand, a good frame of reference for how much more sanding needs to be done is by holding the sword in your hand. When the foamular fits comfortably into your palm, is not bulky, and has the correct shape, you're ready to start buffing out the finer details with your p400 grit sand paper.
 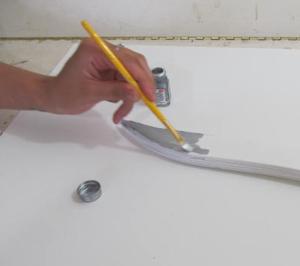 • Make sure to brush off any foam dust from your sword before you begin painting. That is always a good rule of thumb: apply your decorations to clean surfaces. For our blade, we used Testor brand Silver Metallic Enamel. The results are excellent and mimic fresh steel perfectly. With any brush of any size, simply paint the entire blade, all sides, with silver enamel. Allow for about ten minutes drying time and you're ready to paint your handle. For our handle, we used Partha brand Gold Metallic enamel. The metallic effect will be diminished greatly by the absorbency of the foamular, but that is a plus. Because of that, the intricate Elven vine patterns winding up the handle and along the length of the blade will stand out immensely.
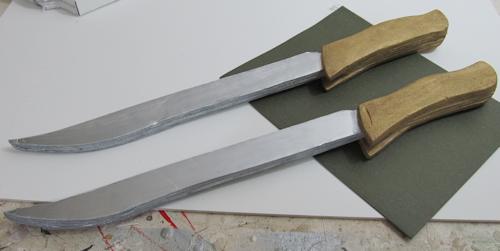
 You have lots of options when it comes to decorating the handles and blades of your swords. One great thing is cutting curls and curves out of gold paper. We used origami foil paper. You have to experiment with different types of adhesives when doing this. Some don't work so well and others will eat the foam or distort the painted colors. Mod Podge usually is a good choice for this.
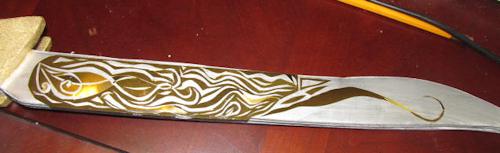
 Make the Assassin's Creed Altair Sword
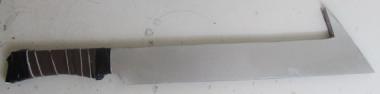
 Make a Glowing Sword -Sting from Lord of the Rings