There are probably a lot of different ways to make coal but what seems to me to be the best two ways involve using a 55 gallon drum with a locking seal on it.
Making the Coal yourself - You will definitely have to experiment with this process tofind what is suitable to you. But this will give you the process.
The Wood to use. Any old common wood from trees will work just fine - the types you buy by the chord is terrific, split and ready to use. But, whenever you make a batch of coal in your barrel you should try to keep that batch all out of the same type of wood. This will insure a good even burn and good quality charcoal.
The maximum thickness of your wood is important. You want to try to stay reasonably consistent with the sizes of the pieces of wood and you want your maximum thickness to be about four inches.
If you do not have, or can't get tree lumber you can use regular home building wood like 2x4's and 2x3's. This will work perfectly fine and being pine it will burn pretty hot in your forge. Just make sure that you do not use any kind of treated lumber. This is embedded with chemicals which are toxic if burned. Your forge will give off toxic chemicals.
Here is one of the barrels we use to make coal.
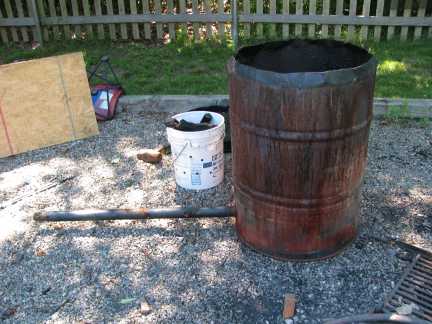
You will need to add some kind of pipe at the bottom of the barrel so air can flow in. This pipe should go to about the center of the barrel.
Pile newspapers and small twigs in the bottom (about 6-10 inches). This is your fire starter.
Start it on fire and once it is burning well add some of your wood that will be charcoal. Keep the fire going and add more kindling if you need to.
Once the fire has burned off and you have glowing embers inside, it will be really hot; put the cover on it and seal it as best you can. Leave the bottom vent open.
Now just let it burn itself out. It will burn out and in 24 hours your coal will be done.
Another Method for making coal:
 You can put your pieces of wood in a sealed barrel then heat that barrel up for four hours (this time will vary). The heat and gas pressure inside the barrel will turn the wood into charcoal. This method gives a larger yield but you burn up a lot of wood keeping the fire going. And you use a sealed drum but, and I can't specifically talk to this but I believe the drum shouldn't be totally sealed. I believe it might lead to the possibility of the drum bursting or the lid blowing off. I am not 100% sure of this but I advise you be careful when trying this method. Research it more! You can put your pieces of wood in a sealed barrel then heat that barrel up for four hours (this time will vary). The heat and gas pressure inside the barrel will turn the wood into charcoal. This method gives a larger yield but you burn up a lot of wood keeping the fire going. And you use a sealed drum but, and I can't specifically talk to this but I believe the drum shouldn't be totally sealed. I believe it might lead to the possibility of the drum bursting or the lid blowing off. I am not 100% sure of this but I advise you be careful when trying this method. Research it more!
Another Suggested Process: (I have never tried this process but it looks pretty good) The barrel used in this process has a hole in the bottom and a lid with a locking ring.
You start a fire in the barrel with newspapers and small twigs. Once this fire is going strong you add your pieces of wood that you want turned into charcoal. Put the lid on it but crack the lid open a bit by putting a branch that is about 2 inches thick. The smoke at this point will be white.
Monitor the smoke and in between 2 and 4 hours the smoke will turn bluish. This means the initial burn is complete and the coal is now burning.
You put on the lid and seal it and seal the bottom opening on the barrel. This starves the burn of oxygen. With the handle of a shovel or a hammer you tap along the sides of the barrel, toward the bottom to help the wood and coal settle down. Now let it sit for a full 24 hours and you will have coal.
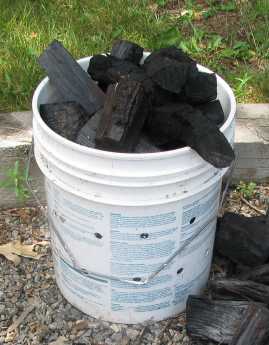
How to know if your coal is good.
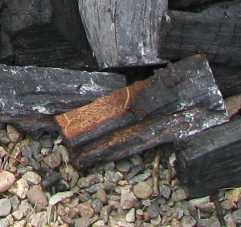 You can see in this picture that some of the wood hasn't burned. This piece of coal is obviously not done. Your coal might look good on the outside, completely black, but it might not be done on the inside. What you should do is break open a few of the medium sized pieces and insure the black coal goes all the way through. The pieces should be very easy to break and not have any brown wood left. You can see in this picture that some of the wood hasn't burned. This piece of coal is obviously not done. Your coal might look good on the outside, completely black, but it might not be done on the inside. What you should do is break open a few of the medium sized pieces and insure the black coal goes all the way through. The pieces should be very easy to break and not have any brown wood left.
 Blacksmithing for Beginners - Blacksmithing for Beginners -
This book will get you blacksmithing fast and easy. It is an introductory guide to blacksmithing for people who have little or no experience with the craft. It explains with 50 pictures and illustrations what a forge is, what the tools are, the parts of an anvil, and how it all works. It also shows you the things you will need to get started and where you can get them - and even how to make your own simple forge if you need one.It is a complete introduction to blacksmithing that includes a series of tutorials with pictures showing you step-by-step how to perform basic blacksmithing techniques like pointing and bending. Written in an easy to understand style this book explains to you why the blacksmith heats steel and why the changing color of the steel when heated is important. You will gain an understanding of what blacksmithing is and what the basic techniques and fundamentals are. And this will give you a solid groundwork for moving forward into creating a wide array of objects, tools, and items. This book will give you the confidence and knowledge you need to start hammering hot steel into shape.
 
The Backyard Blacksmith: Traditional Techniques for the Modern Smith
The Backyard Blacksmith shows you how -- with some patience and a working knowledge of metals, basic tools, and techniques -- blacksmithing can be easy to learn, and a rewarding hobby. Through instructions and illustrations, readers will learn to make simple tools and useful items, such as nails, hinges, and handles, and also an interesting mix of artful projects, such letter openers, door knockers and botanical ornaments.
Detailed step-by-step full color exercises teach all the universal skills and techniques used to forge iron; it's like having a master blacksmith by your side
Provides the reader with an understanding of the properties and characteristics of forging hot metal, making the craft accessible to those without previous experience
Over 20 beautiful and function projects organized by difficulty level allow new blacksmiths to progress at their own pace and master the skills they learned in earlier chapters
|