- To make this a project that the boys could finish mostly on their own and within an hour (roughly), I made the side assemblies in advance. (We made 6 trebs in all, so it was kind of assembly-line work.) I also pre-drilled all the holes (throwing arm, pilot holes in the cross braces and for the eye hooks). The boys were able to do everything but the weights and slings all by themselves; we had parents to help out with the rest.
- I found that a 5 1/2" lag bolt made a great axle. I found some at Home Depot that are 1/4" thick, and are only threaded on the last inch. The length was just right for your dimensions. And I didn't have to rip apart any toys.
- I had to fiddle with the weights. Your instructions show that 6 AA batteries would be sufficient, but I wasn't able to get a good throw (again, with a grape) until I taped 4 D batteries together. I'm sure there's some math involved that I didn't look at. Rigging the batteries to pass through the frame cleanly took some fiddling, too.
Just for fun, I multiplied your dimensions by three and made another trebuchet out of 2x4s I had in the garage. Alas, it didn't work as well as I'd hoped - I think there's some relationship between the weights, the mass and length of the throwing arm, the length of the sling, and the weight of the projectile that I needed to give more attention to. The boys thought it was cool anyway. Maybe over the summer I'll figure it out.
"Chris C-S, Den Leader, MN"
I want to give my thanks to Chris for the terrific tips on this project and I want to say I am glad that the scouts had so much fun with it!
I also want to say that the idea of using lag bolts for the axle is perfect! This is a great solution and its easy to find the lag bolts at any hardware store.
If you came to this webpage directly from a search engine here is the beginning of the table top trebuchet project: Make a Small Trebuchet

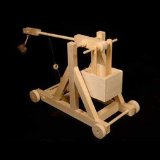
The Miniature Trebuchet by Timberkits
The trebuchet was the ultimate artillery weapon of the medieval period and early renaissance. A large and unwieldy weapon, it was typically built on-site during battle, and tuned to lob great weights - such as the carcasses of rotting horses and pots of burning pitch, over the castle walls and onto its inhabitants. Precision carved by computer controlled machinery for guaranteed fit and accurate joinery. The detailed instructions include loads of photos of each step of the construction process, tuning tips and safety notes. Included in the kit are four wooden projectiles, all the necessary components for the sling, trigger, and counterweight bucket as well as all the parts for the kit. The only thing you'll need to supply are 88 pennies for counterweight and a few simple tools - Scissors, a ruler, a utility knife, wood glue and a few rubber bands to hold the pieces together while the glue dries. Manufactured by RLT Industries
The Miniature Trebuchet - The trebuchet was the ultimate artillery weapon of the medieval period and early renaissance. A large and unwieldy weapon, it was typically built on-site during battle, and tuned to lob great weights - such as the carcasses of rotting horses and pots of burning pitch, over the castle walls and onto its inhabitants. This is our newest and smallest trebuchet design in a long line of catapult kits. Designed by master trebuchet expert Ron Toms, this machine is ideal for the student on a budget or as a wonderful display piece for any desktop or bookshelf of any history enthusiast. Precision carved by computer controlled machinery for guaranteed fit and accurate joinery. The detailed instructions include loads of photos of each step of the construction process, tuning tips and safety notes. Included in the kit are four wooden projectiles, all the necessary components for the sling, trigger, and counterweight bucket as well as all the parts for the kit. The only thing you'll need to supply are 64 pennies for counterweight and a few simple tools - Scissors, a ruler, a utility knife, wood glue and a few rubber bands to hold the pieces together while the glue dries. Tools required: Scissors, Glue, Ruler, rubber bands and a utility knife. Sandpaper is optional. Additional Counterweight Required: 64 pennies. Range: About 10 feet. |


