


Let's have some fun with our projector
This is a group of ideas that go along with the constellation projector. If you are unfamiliar with that project it is something you can easily make with a few basic supplies to project constellations onto a wall. That tutorial is right here.
Options and ideas for this project
 Using aluminum foil rather than 3x5 cards It works quite well. Just be careful piercing the holes. Make them nice and round and try not to tear the aluminum foil. But, this has the added benefit of reducing ambient light. Index cards, depending on how thin they are, can glow. Some of the flashlight shows through them. This lightens up the room. But if you use aluminum foil you eliminate a lot of this ambient light keeping the room darker and the stars brighter.
Recognizing constellations without the lines!
 This is a good activity for people and for kids. When you see constellations on a map, in a book or on a flash card it is easy to recognize it. The lines between the stars help a lot. But when you look up at the sky there are no lines between stars! The constellation projector that we make only projects stars - no lines. So you can put up a card, project it onto the wall and then see if the kids can recognize the constellation by the star placement.
Identifying unique and unusual celestial objects
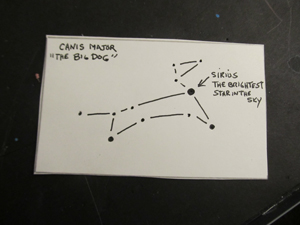
On the index cards that I give you in the template I have also pointed out some of the more unusual objects like colorful stars or extremely bright stars. These stars have official names like Polaris (The North Star) and Arcturus (the Bear Star). You can see if kids or people can recognize and name these specific objects within a constellation.
Varying the hole size of the stars
On the constellation cards I give you I have varied the size of the stars according to how bright they are. This adds a nice dimension to the project. You can use your tack or needle to also vary the size of the holes according to the star sizes.