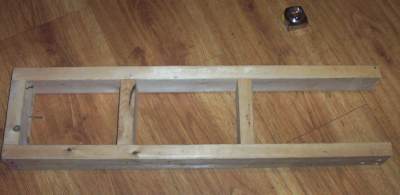
This picture shows my base. It is 40 inches long and twelve inches wide. To get an idea of the size of it there is a tape measure in the picture. This thing is nice and solid. I used screws rather than nails to secure all the pieces. One end is left open but it doesn't matter. You can put a piece of wood on that end if you want.
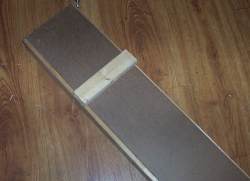
I have cut a thin piece of wood (dark brown) and covered the base of the trebuchet with it. You can see a 2x4 laying on top of it. And this is the next step you should cut a 2x4 the same width as your trebuchet base.
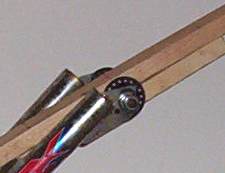
Now mount the axle of the BMX bike directly to the center of the 2x4 you just cut. Notice that I have used bolts here. Nails and screws are not strong enough! And I used only 2 bolts in diagonal corners. This is because If I used 4 bolts it may have weakened the 2x4 and made it susceptivle to splitting.
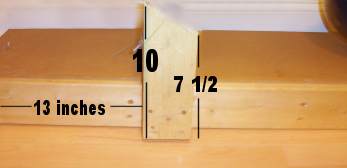
Now cut two pieces of 2x4 that are ten inches long but cut at an angle on one side so the short side is 7 1/2 inches long. And mount these two, one on each side at 13 inches from one end of the trebuchet base. Make sure that the ten inch side is toward the thirteen inches away from the end.

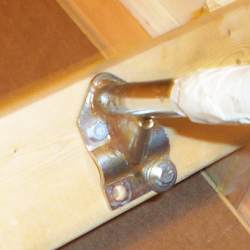
Now bolt your arm and yoke assembly right to these angular boards. Make sure you use bolts because I broke this assembly twice trying to fire it. The first time I used nails, the second time I used screws and the board split each time. The black arrows show the bolt going right through both pieces of wood. I used a six inch long bolt.
Your base is almost complete. Mount the swing arm into the fork.
Mounting the swingarm into the fork was easy because this is the axle and fork from the bicycle. They are made to go together. The long side of the swingarm is on the left. Even though the left is the short side of the base. This is because the fork reaches far to the right of the assembly.
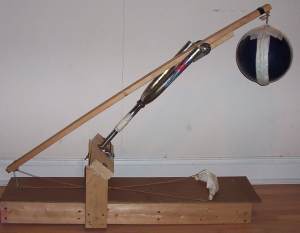
Here is an example of the comleted assembly so you can see how the fork and arm are mounted. Before you make and mount the counterweight you should push down on the left side of the swingarm (the long side) and make a mark where the eyehook touches the base of the trebuchet. Then mount an eyehook right into the base.
This eyehook should match up with the eyehook on the swingarm. What you will do is push down the trebuchet arm and put a pin through both eyehooks, this will hold it down. then when you pull the pin out the trebuchet fires off.
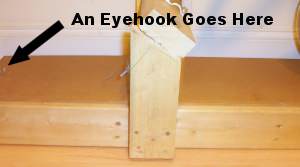
The photo shows the eyehook in the base. When you lower the arm the eyehook on it will line up with this eyehook and you can put a pin that passes right through both of them. I put my pin on a long string so I could stand back and fire it off.
 Lets build the string pouch and the bowlng ball counterweight Lets build the string pouch and the bowlng ball counterweight
 The Miniature Trebuchet by Timberkits The Miniature Trebuchet by Timberkits
The trebuchet was the ultimate artillery weapon of the medieval period and early renaissance. A large and unwieldy weapon, it was typically built on-site during battle, and tuned to lob great weights - such as the carcasses of rotting horses and pots of burning pitch, over the castle walls and onto its inhabitants. Precision carved by computer controlled machinery for guaranteed fit and accurate joinery. The detailed instructions include loads of photos of each step of the construction process, tuning tips and safety notes. Included in the kit are four wooden projectiles, all the necessary components for the sling, trigger, and counterweight bucket as well as all the parts for the kit. The only thing you'll need to supply are 88 pennies for counterweight and a few simple tools - Scissors, a ruler, a utility knife, wood glue and a few rubber bands to hold the pieces together while the glue dries. Manufactured by RLT Industries
|


