Hi, Thanks for visiting my website. My name is Will and if you have questions
or would like to
contribute projects or ideas you can contact me
The Multi-Pult
A Rapid Fire Automatic Catapult
This is the Multi-pult. It is a catapult with multiple swing arms so it can throw multiple projectiles in rapid succession. I have built this catapult with five swing arms but there is no reason why you can't add more!
This is a pretty easy project to make and there are just a few different parts. I will show you these various parts but you can improvise a lot of the materials, be creative and see what you can do. I bought most of these materials at a home improvement store.
The Video
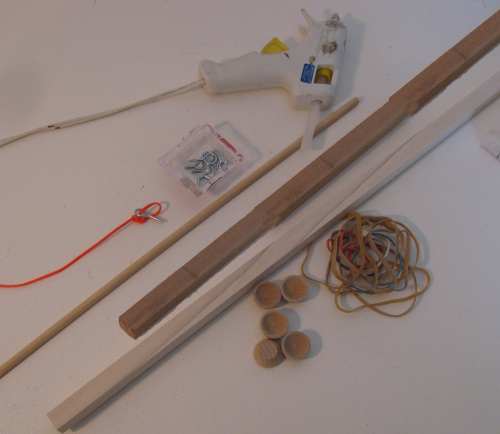
Here is a look at the tools and materials that I used to make this multipult project.
Tools: Small saw to cut the wood, and a drill. Also a glue gun to glue the parts together.
Lengths of 5/8 inch square wood
Lengths of 1/2 inch square wood
Rubber bands
1 1/4 inch wooden dowel about 12 inches long
A variety of small eye hooks (I used 30 of em for this project)
Some small wooden bowls for the catapult basket. You can make little boxes out of paper
Some orange string for the catapult trigger pulling
That's about it and you can of course improvise a whole lot of this. Let me show you how it is built.
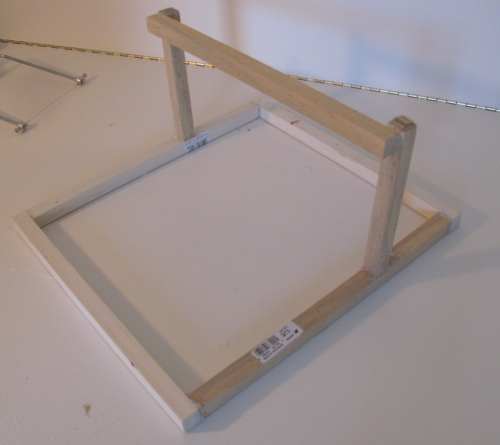
I built the whole base of the catapult using the 5/8 inch wood. I used this thicker wood because it is stronger. IN the picture you see that there are four pieces that make up the base. These are all twelve inches long. There are two uprights and these are 6 inches long. The one crossbar piece is twelve inches long.
Glue, nail, or screw the two uprights in place about four and one half inches from one end of the square base as shown.
Important note about the crossbar at the top of the uprights. It has to be on the side of the uprights shown! Don't put it on the other side.
Now let's work on the swing arms:
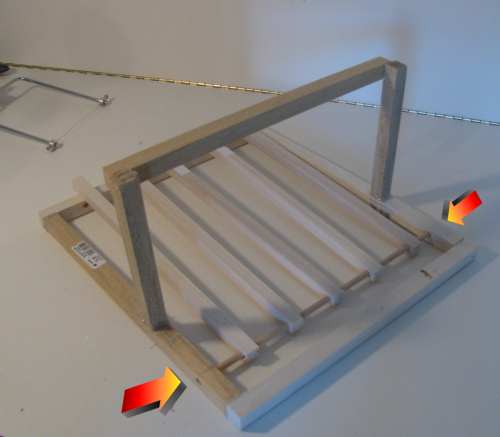
I recommend you cut five pieces of the 1/2 inch wood and drill their pivot holes then mount them into the dowel as shown. You should put this all together and mount it into the catapult base before you start adding all the hooks. This way you can put the hooks in just the right places.
The picture below shows how it is set up. Do not glue any of this in place so you can take it out and work on it. The arrows show that I have drilled quarter inch holes in the base for the dowel to fit into. These holes are 2 inches from the end of the base.
The holes in the swing arms are 1/4 inch and I drilled them pretty liberally so the dowel would rotate very easily in the holes. Drill those holes near the very end of the swing arms.
This next picture gives you a good idea of what the whole swing arm assembly looks like.
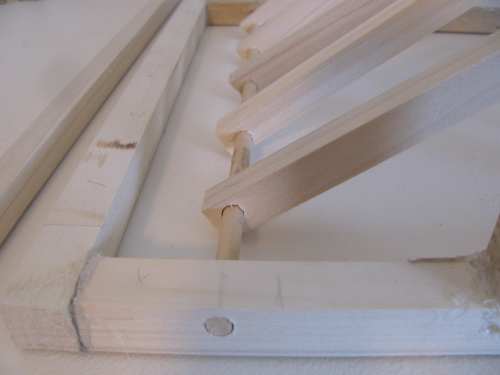
Ok, from here we just have to finish this catapult off! This entails the rubber bands, the release strings and the various eye hooks.
The following picture shows how to set up the rubber band propulsion system. Each swing arm gets an eyehook and a rubberband. And each swing arm has a corresponding eyehook on the crossbar. Push the swing arm up so it is against the horizontal bar. Then put the eyehook in the swing arm just above the bar. Notice how I opened up the eyehook that is mounted to the cross bar. This way you can just hook the rubber band right onto it.
Now for the final part which is probably also the most difficult, although not really very difficult at all.
Let's Make the trigger mechanism
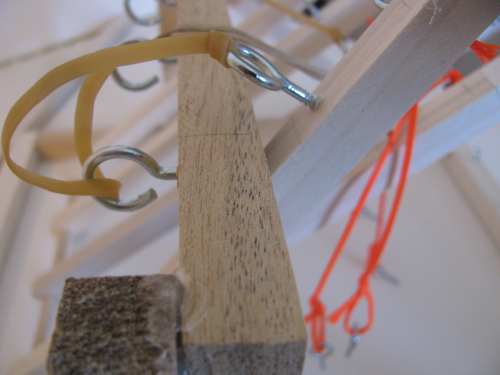
This picture shows how to place two eyehooks as the release mechanism on the swing arm. One eyehook is in the base and one is in the swing arm. Be sure to put them on the left side as shown! When the catapult arm is depressed fully down these two screws should line up nicely so you can put a straight object like a nail or screw through them.
Do this for all five swing arms.
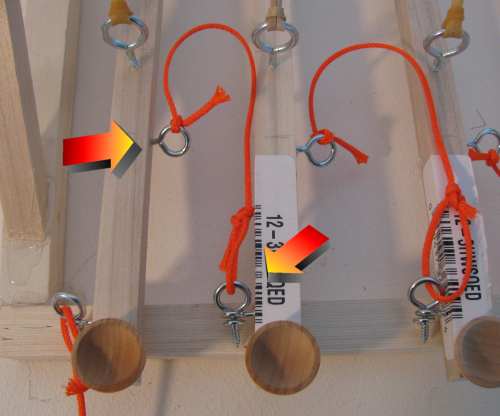
The following picture shows you how to make and install the release triggering string.
The first catapult arm on the left is simply triggered by you pulling on it. But the following string arms are triggered automatically.
Put an eyehook in the side of the first swing arm about three inches from the cup end. (shown by first arrow) Then tie a piece of string to it and on the other end of the string put an eyehook. That eyehook goes through the two locking eyehooks of the next swing arm. Can you see how when the first arm goes up it pulls the string and eyehook right out of the two locking eyehooks?
The total length of the string on my catapult is six inches from eyehook to eyehook. This should be about right for you. Just make it so the string full releases the eyehook before the swingarm hits the crossbar.
Simply repeat this process on the first four swing arms. No need to do it on the last swing arm because that one doesn't release another one.
Have fun with your catapult building and if you want to see my multipult in action be sure to watch the youtube video at the top of this page.
AND- IF you like catapults, trebuchets and siege engines be sure to check out my siege engine homepage
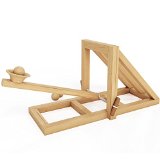
Engage in a fun hands-on learning experience and build your own desktop catapult with the included easy-to-understand instructions and pre-cut wooden pieces
Test your precision and your catapult's power, or change the trajectory angle with the adjustable cord
Take aim and fire away with five lightweight wooden ammo that's safe for indoor use
Replicate the ancient art of war, or learn about the physics and engineering while constructing the catapult
Guaranteed fun for all ages, imagination and wood glue not included
Utilizing easy-to-find and inexpensive materials, this handy resource teaches desktop warriors how to build a multitude of medieval siege weapons for the modern era. Novice combatants will learn to build 35 defense weapons, including a marshmallow catapult, a chopstick bow, a bottle cap crossbow, and a clothespin ballista. In addition to beefing up their Dark Age arsenal, would-be warriors are provided with a number of targets on which to practice their shooting skills. Clear diagrams, instructions, and safety tips for each project are included, making construction of each of these weapons simple, safe, and fun.
This bestselling DIY handbook now features new and expanded projects, enabling ordinary folks to construct 16 awesome ballistic devices in their garage or basement workshops using inexpensive household or hardware store materials and this step-by-step guide. Clear instructions, diagrams, and photographs show how to build projects ranging from the simple match-powered rocket to the more complex tabletop catapult and the offbeat Cincinnati fire kite. The classic potato cannon has a new evil twin-the piezo-electric spud gun-and the electromagnetic pipe gun has joined the company of such favorites as the tennis ball mortar. With a strong emphasis on safety, the book also gives tips on troubleshooting, explains the physics behind the projects, and profiles scientists and extraordinary experimenters such as Alfred Nobel, Robert Goddard, and Isaac Newton. This book will be indispensable for the legions of backyard toy-rocket launchers and fireworks fanatics who wish every day was the fourth of July.
The ballista was the ultimate artillery weapon of the Roman Empire. Similar in appearance to a giant crossbow, it was powered by massive bundles of twisted horse hair. The bolts it fires would mow down enemies and fortifications alike. This kit is based on the Roman design. It is laser cut from select hardwood for easy assembly and reliable performance. This tabletop kit has been designed for simple assembly. Designed with interlocking parts, a simple, reliable trigger, high strength cordage and lightweight projectiles this ballista is incredibly durable. Three easy-to-follow rules for public demonstration are provided to ensure everyone's safety.


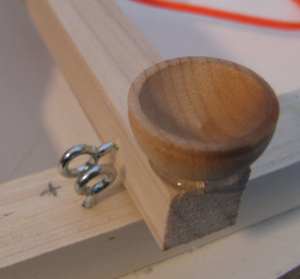 This picture shows how to place two eyehooks as the release mechanism on the swing arm. One eyehook is in the base and one is in the swing arm. Be sure to put them on the left side as shown! When the catapult arm is depressed fully down these two screws should line up nicely so you can put a straight object like a nail or screw through them.