Fantasy Art School Banner

Home

Home

Youtube graphic
I have a youtube channel with over 700 Videos!


Become a Patron


The Art Lessons

Lessons by Guest Artists

Art Books and Supplies

Will's Other Stuff

More Stuff


Will
Hi, Thanks for visiting my website. My name is Will and if you have questions
or would like to
contribute projects or ideas you can contact me Will

Lesson 17: Draw a fantasy dagger


One of the fundamental lessons of drawing is understanding how a drawing develops from the beginning to the end. When you are drawing something you are in essence building it using the tools of your eye, hand and pencil. And this is much like building a house in that you have to lay out a foundation and then build in logical steps until it is complete.


In this lesson we learn how to draw a fantasy dagger using the Five-S method of drawing. They are:

1. Silhouette
2. Shape
3. Shade
4. Smudge
5. Shadow

Of course there are many ways to draw and this is only one method. Over time you will develop your own style of drawing. This system helps you understand the basics of building a drawing.

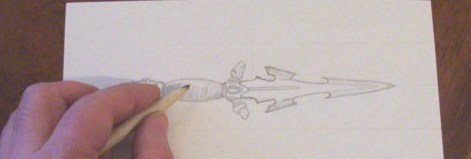
STEP 1 Silhouette: This is the first step. What you do here is look carefully at the subject you are drawing and then in light lines you draw a silhouette of it on the blank piece of paper. In this step you don’t have to do just the outside lines of the subject you can do some of the inside lines too. But keep them very scant and very light.

Break it into sections

I have drawn my silhouette rather dark so it will show up well in the scan and on this webpage. You should draw your dagger nice and lightly. As you are drawing the shape of it you will see that the lines need to change. With light lines you can modify them easily. See how I have also drawn some vertical lines and lines through the center of the dagger. Draw guidelines to help you get a feel for the shape and the relation of the different parts of the object you are drawing.

STEP 2. Shape: Fill in the internal lines of the subject. Use the strokes and directions of your pencil to represent the shape of the parts of the subject. If a part of the subject is curved you should use curved lines in that area of the drawing and in any flat sections you should use straight lines. But for now you are not filling anything you are just getting the shapes right. It is in this part of the drawing that you should refine all the lines and get the drawing to look like the object you are drawing.

Get the shape
This picture is a little light but you can get a good idea of what I have done here. Looking at the dagger I have filled in a lot of the inner lines. We are no longer just doing the outside. I have added some darker spots. These spots are the beginnnig of the shading.


STEP 3.Shade : This is where you fill in the shapes with either color or shades of grey. Look carefully at your subject and note how light falls on it. This is the most important aspect of this step because even if a surface is all one color it may have different shades of that color depending on how light affects it.

STEP 4. Smudge : You can use your finger for this step but it is preferable to use a tortillon (blending stump). I have a tutorial that shows you how to make your own tortillon blending stumps Very few subjects or objects are composed of sharply defined lines. Everything is composed of subtle gradations of color that flow around and through the surfaces. You should blend the colors on your subject using strokes that follow the shape of the subject - rounded areas should be done with rounded strokes etc.

Drawing a dagger


STEP 5. Shadow: This is the final step. Look to see how your object or objects cast shadows on themselves or on the things around them and add these shadows. If you are using color in your drawing the shadows should be composed of darker shades of the same color. This will ground your object in reality. You should also use an eraser to erase any graphite or color from areas that have bright light reflections on them.

The drawing
The Completed Drawing


Drawing is not magic but it does take practice, skill, and an understanding of the process that is taken in order to go from a blank piece of paper to a finished product. The Five-S method is a good way of helping you to understand and to remember this process.

Creating Spaces in your drawings - This next lesson uses a Dragon's Lair as its example


Sign up for my newsletter!

Do you like making projects and exploring a variety of hobbies?

Sign up for my free newsletter. I give you regular updates on hobbies and projects you can make. it is totally free and I don't share your email with anybody.