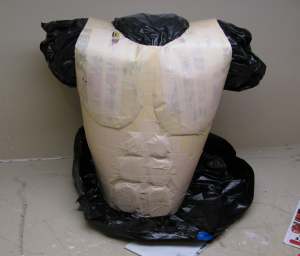
Put an open trash bag into the chestpiece through the waisthole and fill it tight with crumpled newspaper. This will give you the exact shape that you are looking for. Manipulate it, squeeze it, fill it with more crumpled paper until it is the final shape. Once you paper mache it you can't adjust the size or shape.
First cut lots and lots of strips of newspaper 2-4 inches wide.
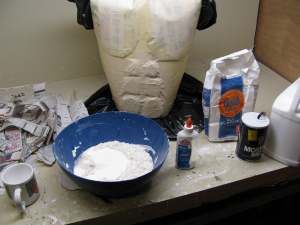
Then mix your paper mache. You have a couple of different recipes you can choose from.
To do a basic and easy mache you mix 2 cups of flour, 2 cups of water and 1 tablespoon of salt in a big mixing bowl. And you are ready to go.
If you want a stronger mache then mix 2 cups of flour, 1 cup of water, 1 cup of white glue and a tablespoon of salt. The glue will make it more durable.
Note about paper mache: You might have to add a little bit of water. Just judge it accordingly. It should be like a watery cream of wheat and not as thick as oatmeal.
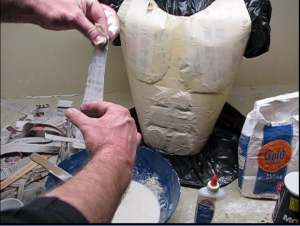
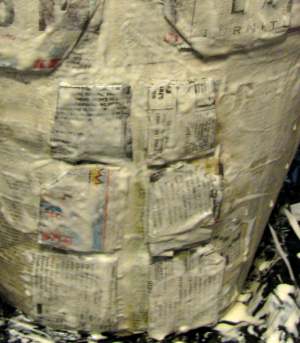
Dip a strip in the paper mache mix and get both sides wet. Then wipe off the excess by using your fingers in a scissor like motion (shown in picture) and apply this right to the chestplate. Cover the whole object and overlap all the pieces of mached newspaper. Overlapping them will make the chestpiece stronger.
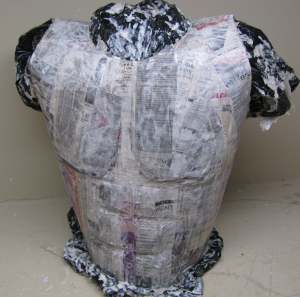
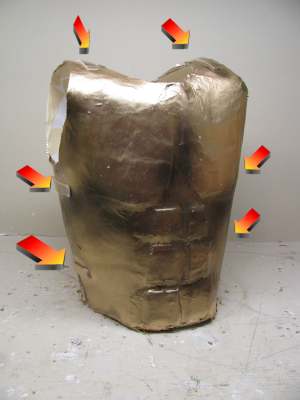
This picture shows the paper mache is done and drying. You have to do at least two coats and I recommend you do three. Wait overnight between coats to let it dry. You can use a fan to speed the drying process.
Note: After the first layer of paper mache is dry you may see that you are losing the shape and definition of the musculature so...
You can apply wads of paper mache before you do your second coat. These wads will help the definition show more.
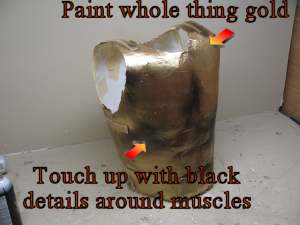
The painting scheme - Once it is completely dried you can paint it.
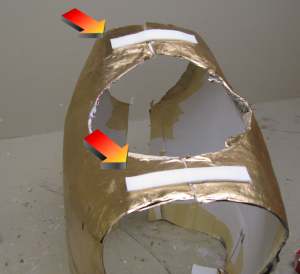
Once the paint is dry cut it open along both sides and both shoulders and remove the bags and crumpled newspapers.
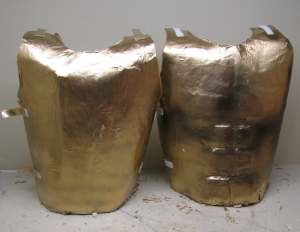
Here are the two halves of the armor. Now all we have to do is to put straps on them so we can put it on and strap it closed.
Put a velcro strap on each shoulder. If you don't have velcro you can use something else. You can even punch holes and use shoe strings.
In all you should put six straps on the armor as shown in the picture at left.
Now you are ready to unstrap it, put on the two halves then strap it together . You should be able to just loosen the two shoulder straps and slide the armor over your head then tighten up the side straps.
This is the end of the tutorial! Have fun and remember I have all the spartan armor and weapons
Alternative Methods to making a Spartan Chest Piece
I got this email from a web visitor. (Rich) He lays out for us a couple of great alternative methods for making a spartan chest piece:
I happened across your youtube video on how to paper mache a Spartan breastplate. I have a suggestion that might help you create a better work of art, and at the same time, look more authentic. If you are not of a muscular build, you have two options that will yield a better result.
Option one is dress your self in an old, tight teeshirt (you will destroy the shirt, so don't use anything you like). Too create a more muscular chest, get two of the large car-washing sponges and cut them to the shape of a muscular chest. Other smaller spunges can be cut for the 6-pack abs. With double sided tape, position them on the out side of the tee shirt. Then put another tight teeshirt over that. Have someone use masking tape to completely cover the part to used as the breast plate. About two or three layers of tape should yeild a great surface to paper mache. Then follow up the normal way you did in the video. Hint.... The velco strips you used can be concealled with the red cape and decorative amulets be connected directly to it, making it part of the costume, and not just a hidden feature.
Option two is get your buddy who has the chest and abs necessary, and do the steps above without sponges and the second tee-shirt. You can also try this technique using pantyhose, taping the legs with duct tape, and following up with the paper mache to creat a mannequin to display the armour you create. I happened upon a large plastic planter that resembles a cement constructed planter for the garden. I realised that the inside of it was the perfect mold for creating a lion head for the chest part of the breastplate. With a little WD-40 or vasaline, the paper will seperate freely yeilding detailled results. Just another idea.
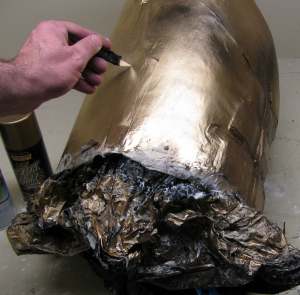
One technique to make the finish more realistic is after the spray paint (gold or color of choice) dries, get a bottle of craft pain of black, and one of a brown (or rust works well) and water them down. Use a sponge to create a beaten metal look by just dabbing lightly, and then brush on the black and quickly wipe it off with an old rag to create an antique looks in cracks. Also, try sanding the paper mache prior to painting for a smoother surface. Such tips can fool people into thinking it is real, until closer inspection. -Rich

Do you like making projects and exploring a variety of hobbies?
Sign up for my free newsletter. I give you regular updates on hobbies and projects you can make. it is totally free and I don't share your email with anybody.
|


