Diorama Making Banner

Home

Home

Youtube graphic
I have a youtube channel with over 1000 Videos!


Become a Patron

Wills Pinterest !


Tutorials

Will's Big Dioramas

Fast Tutorials

Types of Dioramas

Diorama Themes

Time Periods

More

Tools/Supplies

More Stuff


Will
Hi, Thanks for visiting my website. My name is Will and if you have questions
or would like to
contribute projects or ideas you can contact me Will

The Changing Tree Diorama


This is a fun little diorama that I made and it isn't too hard to make. It just takes a few basic supplies. But the interesting about this diorama is that it is a bit different when it comes to the lighting. And.. it is a developing diorama. It changes over time.


I needed a diorama for one of my other websites (willkalif.com) and I needed something that I could change over the course of a year and the idea of a tree was pretty good. I can start it out in February with bare branches and snow. And as the seasons change I can bloom the leaves and the fruit. Then I can change the leaves to autumn colors. Voila, the changing diorama.

A Note about this webpage and project. Well, I just started the diorama so you can only see what I have so far. But over the course of 2011 I will add to this page so you can see the changes.


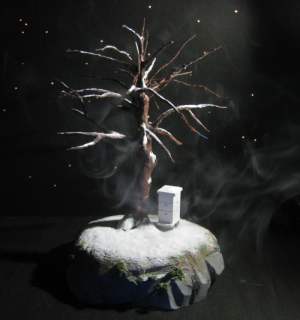
The changing tree diorama in snow

Here is what the tree diorama currently looks like.

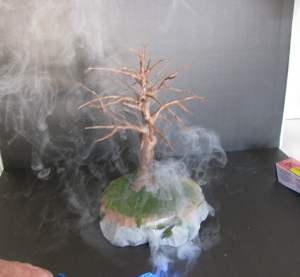
I will show you how I made the tree, the base, and the beehive but first I am going to tell you a little bit about what is really different about this diorama. The smoke and the lighting (including the stars).

I wanted the whole set up to look like it is floating in a dark space and I did it with all the lighting and background set up.


Adding smoke to the tree scene

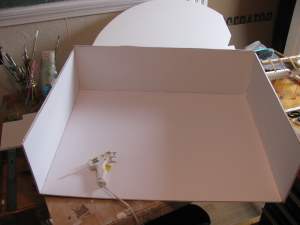
This picture explains how I did everything. The bottom and the backdrop are sheets of foam board with a black side. The upright section in the back is actually a foam board box I made. Once the box was made I put a light inside it.


The backdrop light box

Here is the backdrop light box.


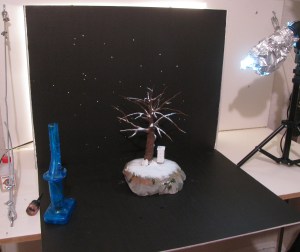
The lighting set up ready for pictures

This picture shows the whole set up almost ready to shoot. I just have to turn the lights out in the room.

What Is In this picture

The Blue thing is an inexpensive battery operated smoke generator. Costs around ten dollars. The light on the right is covered with aluminum foil so I can form it into a spotlight just to shine on the tree. The Backdrop black sheet is the light box I made. You can see that I poked small holes in it to make the stars. I put a lamp inside that lightbox.


How the diorama is Made

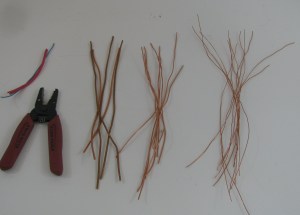
Cutting wires for the tree

The tree itself took a little effort but really isn't difficult. I used solid copper wire in three different sizes. You don't have to use different size wires but it does make a difference. Bundle them all up randomly and tape some of it together as the trunk.


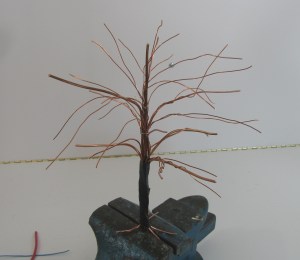
Forming the branches out of wire

You can see in this picture that I have taped up the trunk area. this keeps the bundle together. And I have formed out the branches. Try to simulate what a tree looks like. Some branches go up the trunk further then branch out. And some of the thinner wires are part of a thicker wire, branching out near the end.


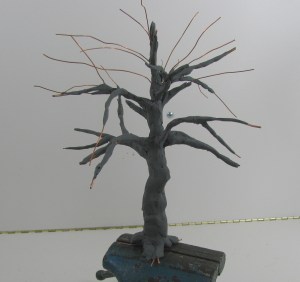
sculpting the tree

Now have some fun applying the clay. I used DaVinci Sculptilina. It is very soft and holds details very well. But it doesn't harden! This is ok for me because I am changing this diorama over time. And I didn't bring the clay all the way out on some of the thinner branches. I put these thin branch sections on with a hot glue gun. It works very well for the thin branches.

You have some options when it comes to kinds of clay you can use. You can use polymer clays, or epoxy putties that you mix and will harden or you can use something like Super Sculpey which will harden in the oven. I have a page with explanations of lots of different clays right here: A look at Clays for sculpting


Now let's take a look at how I made the base of this diorama and finished it.


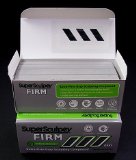
Super Sculpey Firm

Super Sculpey Firm

Super Sculpey FIRM Gray- One Pound - Inexpensive and easy to work with. You can get a lot of practice with this and make some nice miniatures. But it isn't fine enough for real small minis in the 25-28 mm range. And to cure this you bake it in an oven. Nice product. A pound goes a long way. Stays soft forever so need to worry about shelf life. I have more information about this product including tips, hints, pros and cons here. About Super Sculpey Firm