Make a boat out of coffee stirrers
|
|
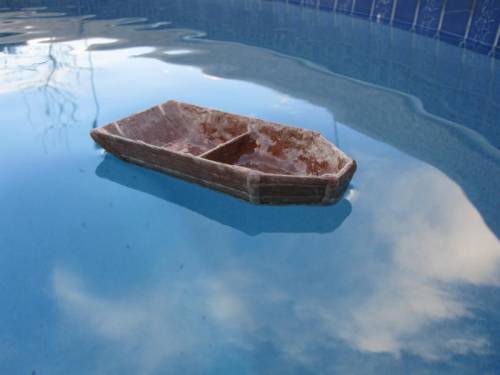
Here is an excellent project complete with pictures and tutorial on how to make a boat out of coffee stirrers. And this turns out to be a terrific looking boat. My thanks go to James D. For making this project and submitting it to this website! |
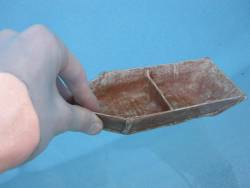
The Finished Boat
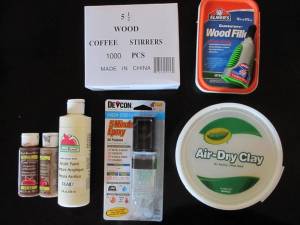
The Materials and supplies used:
 .
.
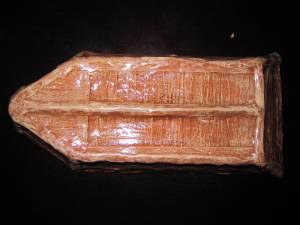
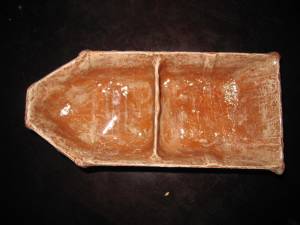
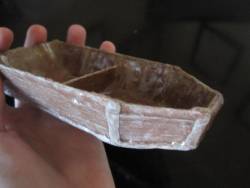
Bottom and top view of the boat
CONSTRUCTION:
The first step to building the model boat is to construct the frame out of plywood, or in my case, coffee stirrers. If you are wanting to build a boat like I did, begin by getting two coffee stirrers, and placing them verticle (I'd estimate about 2 - 3 inches apart).
The second step is to begin gluing coffee stirrirs up the whole 5 and 1/2 inches, horizontally, until the entire piece is filled. Decide the front, and cut off about 1 - 2 inches off the back. Save this peice, since you may want to use it as a short cut later.
The third step is to build the sides of the boat, I build it 6 coffee stirrers high. Construct each side, and cut them accordingly to how long your boat is. The sizes may vary. See the pictures of the side of the boat I built, I cut the back so that it would form the back of the boat at an approx. 45 degree angle
The fourth step is to construct the front of the board. This is the most challenging step, so first start but flipping your base of the boat over so that the 'railing' or planks on the side are face up, and the horizontal planks are down. Figure out the size of the planks needed for the front, so they make a V shape, and glue them on so that the bottom (glued to the base) forms a straight line, while the side poking out is V shaped. This is hard to explain, so see the pictures of the bottom of the boat.
Next, build a support beam for the center of the boat, make sure that both sides are equal, because this is where the basis of the boat starts coming together. I built mine 4 coffee stirrers high (see top pictures of the boat) so that it is tall, but not as tall as the railing. Glue this peice in as straight as possible to that the sides are equal once glued together.
The fifth step is to apply the two side of the boat. Don't worry about any gaps in the boat, those will be filled later.
The next thing you want to do is construct the back of the ship. I used the same method as on the side, only you have to use more than 6 planks high, since there is a slant, and it needs more to connect to the top of the boat's sides. Finally, I used the 1 - 2 inches that was cut off the back, to construct the front. I cut that piece in half (cutting through the verticle piece, and going with the horizontal) and glued them on, no supports were necessary. Then filled in the gap on the front with a few spare peices of wood that have been cut before (See pictures of the fron of the boat).
PAINTING AND WATERPROOFING
 Before you begin painting, use wood filler to fill all the gaps on the inside of the hull, be careful not to get too much on the outside. A little bit won't hurt, or if you wanted the boat entirely smooth, put it on all over. In my case, I only filled in the inside of the hull.
The next step is the take the clay, and shape it around the edges of the boat. Keep it smooth, but at the same time, a bit rough. Once it is painted, it will look like wood, contrary to how it may look now. If you don't believe it, take a look at the pictures and judge for yourself.
Next think to do is to paint the ship. I used a dark nutmeg brown because I wanted to go for an old, worn finish. I did a base coat of black paint, then painted over it in nutmeg brown, and very heavily drybrushed a lighter brown, and then highlighted some of the edges in an off white. In the end, it gave it a very attractive finish.
The final, most tedious, and messy step is "glassing" or spreading clear epoxy on the hull. The kind that I used dries fast, so I had to hurry which resulted in a tiny tad bit of drooping (which you can see in the pictures). Make sure the epoxy is mixed VERY WELL or else it will not dry hard, but instead a sticky rubber. I would recommend testing the material out on an empty milk jug, or something else you don't mind ruining, so you can get the hang of the material. Once you are ready, I recommend that you start on the inside of the hull. Make sure to put a thick coat on the inside bottom to act as a light ballast.
 After you have finished spreading epoxy on the ship, double check that every speck of the boat is covered, and once you are sure it is, it is ready for launching! The boat will be completely waterproof, and very durable as long as it is not dropped, or stepped on.

Do you like making projects and exploring a variety of hobbies?
Sign up for my free newsletter. I give you regular updates on hobbies and projects you can make. it is totally free and I don't share your email with anybody.