-How to put audio on your website
Audio is an extremely powerful and useful tool you can and should use on your website. When you can talk to your web visitors you can really express your point to them. And they will look at your website in a different way. There is a personal connection -almost like a face to face encounter or a phone call. It is a great way to connect. And you can do it for free using a program called Web Audio Plus.
.
.
.
| A Message From Will: When Making this tutorial I used the program to make my own audio. You can play it right here on the right. |
This tutorial takes you through all the steps
Step one: Get the program here: Myonesource.com
If that version doesn't work for you try this one here: Web audio Plus
Step two: Extract and install it to your computer
![]() Step three: Lets run this - Find the Web Audio plus icon on your desktop and click it to run the program. If you don't see an icon look through your start menu items for it.
Step three: Lets run this - Find the Web Audio plus icon on your desktop and click it to run the program. If you don't see an icon look through your start menu items for it.

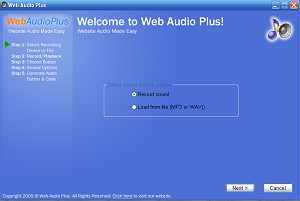
The first screen that pops up gives you a choice to make a new audio or load an already made mp3 or wav file. Easy enough to do. Let's click the Record Sound button and make our own new audio.

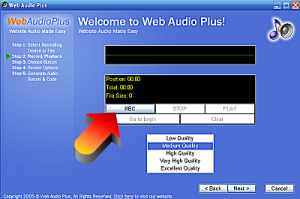
Now all you have to do is press the Record button and you can begin talking. Pretty Darn Simple!
But, you should first make a selection in the box at the bottom that will determin the sound quality. You can try low quality and record a test then play it back to yourself. If it sounds ok then stick with it. The different quality levels will create progressively larger files (which will download slower) So, if possible, use the low quality setting if you can.
Quick Note: Your pc microphone should already be set up but if you are having problems say with the volume you can adjust the microphone by going to Start >> Control Panel >> Sound, Speech, Audio in Windows.
Okay, Record your message and click Next

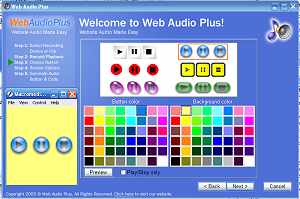
This next screen is pretty easy to understand. You select the look and color of your play buttons. Select something that fits in well with the look of your website. Then Press the Next Button.
Now, this is where it might get a bit tricky so I have created a really big picture for you to look at:

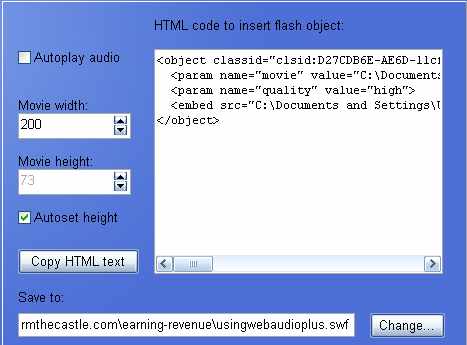
The Big white box that is labeled "Html code to insert flash object:" is where you get the code to put into your website. You copy and paste this into your webpage where you want it to go. But don't do that yet.
CHANGE THE NAME OF YOUR AUDIO FILE
In the lower box called "Save to:" there is some important information. You see the last part of the line? In this case it is called \usingwebaudioplus.swf
I made that name up. So my file will be called: usingwebaudioplus.swf
The program puts a default name in there. Change that default name to something you want. It should identify your audio program. Something like myfirstaudio.swf is great
NOW CHANGE THE LOCATION IT IS SAVED TO
Flash can be a bit tempermental and you have to save this file into the exact same folder where the webpage resides. So press the Change button and browse to the folder where your webpage is saved. This page you are seeing now is in my earning-revenue folder so I saved it there.
Dont forget that when you upload the page to your website you also upload this swf file too.
NOW just copy the code in the big white box and paste it into your website and you are done! Of course you need to upload the webpage and the swf file to your site.
You are done! Now you can make recordings to connect with your web visitors.
ONE QUICK TROUBLESHOOTING NOTE
I use dreamweaver to compose my web pages and when I paste the code into my webpage dreamweaver resolves it to a relative to page location which makes it wrong. So once you paste it into your webpage make sure you take a look and verify it points to the location of the swf file in your website.
![]()
Hi! My name is Will and I want to thank you for visiting my website. I hope this tutorial has been helpful. If you are a small webmaster just trying to make a go of your website and would like to make or increase the money it brings in I have lots of stuff here on this site for you. It's all totally free and I lay out all the things I have done and learned over the years. I hope it helps and have some fun. The Tutorial starts here

SUBJECTS

This is a Stormthecastle.com website
- Avoiding the Number One mistake that new webmasters make
- The concept of "Intent to Purchase" and how it will make you more money
- How to easily put adsense ads on your blog using a plugin
- My Free pdf: The webmasters crash course on how to make money with a website
- Affiliate Programs to sign up for and earn money with - They are free!
- Identifying multiple benefits to maximize your time and your income
- Piggybacking and prognosticating: Two techniques for increasing revenue
- Tips on Increasing Holiday Sales from Affiliate programs like Amazon
- How to make money playing video games
- Put a free photo gallery on your website
- Put a form on your website so you can have a contest and build an email list
- Put the new google video ads on your website
- Working with Google and getting Google to work for you! (Sep 21 07)
- Adding the Unspun widget to boost amazon book sales
- How to add audio messages to your site -
- An example of the development of a website How I started and how I ended
- A basic primer on metatags, how to do them
- Make a robots.txt file -
- Thinking creative
- Create HubPages
- The webmasters list of creative ideas
- take the test:
- How to post a youtube video to your website or wordpress blog
- The tutorial to end all tutorials: How to make money with a website without spending a dime
- Making banners for your website
- How to Make your website a success in three simple steps
- About my new website for creative webmasters
- Use the ebay free affiliate program (Jan 28)
- How to monitor your web traffic for free
- Naming your webpages -
- Keyword laddering -
- Rafting the Amazon. How to get affiliate code onto your website (Dec 22)
- The best way to drive traffic to your website is...
- Optimizing graphics, a must for all webmasters
- The important thing about google that nobody talks about
- Put a newsfeed on your website in 5 minutes flat
- Open a free Amazon Astore for your site
- Why and how to add alternate ads to your google adsense ads
- Table of Contents for the Tutorial
- Introduction
- Checklist for what to do
- Brainstorming ideas for your website
- get a free site
- get a paid site
- choosing a domain name
- get free web design software
- ftp your website
- Now let's add some awesome content
- Join the free Amazon. com affiliate program
- Open up an amazon Astore for free
- Register with search engines
- Creative ways to advertise and promote your site
- Guestbooks & Bulletin Boards
- Write essays
- Submit to directories
- Google adsense
- Feedback- tracking your website progress
- Spider friendly design -
- Keep tables straight
- How to register a domain name
- STAY MOTIVATED
-
Here are some great website ideas for making money -
- Review Movies for profit - Can you write movie reviews? Heres how to do it.
- Book Reviews for profit
- Tutorials are a big money maker
-
Recommended Books web design, google, amazon, search engine optimization - A little information can go a long way
-
Money Making Advanced Topics -
- Keywords and more keywords
- Design for easy search engine crawling
- Using a sitemap
- Google ads: Place them on the page properly to increase your sales
- Advanced article writing
- Vegetarian Dragons -
- Ancillary Products -
- List of Affiliate Programs to join
- Podcasting
for profit
- All Materials, unless otherwise stated are Copyright© 2001 -2015
Kalif Publishing and StormtheCastle.com If you want to reproduce any of these articles you may do so if you follow the rules on the copying my articles page here - If you have questions
or would like to
contribute you can
---------
- How to register with search engines to drive traffic to your site
- Swapping Links with other webmasters
- Basics of clean web design
- Modify your 404 page - very important
- Basic web design software for free
- Stop Making excuses and just do it
- Keeping Tables straight