There are many different ways you can do this project. If you feel ambitious you can do the whole project without cutting the bottle. You simply put everything in through the hole at the top. When it comes time to transplant your plants into a bigger pot or into a garden then you will cut the bottle open. (Note: Whenever cutting with scissors or a knife please seek the help of a parent or adult)
What you need to make this Soda Bottle Terrarium |
 |
- One 2-liter bottle of soda (with cap)
- Potting Soil
- A handful of small stones or pebbles
- A Marker
- Scissors
- Seeds
- Seedlings (small plants) this is optional if you want to start right out with plants in your terrarium
- Extra: If you want to make a really good terrarium you would also use activated charcoal and spaghnum moss. More on this below.
|
| |
|
|
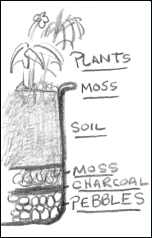
Here is how you arrange the materials in your bottle from the bottom up: ( the red items are optional)
- Pebbles
- Activated Charcoal
- Spaghnum or Spanish Moss
- Soil
- More moss
- Plants
|
An Explanation of why you build your terrarium like this.
Why Pebbles? The pebbles at the bottom allow excess water to flow to the bottom of the bottle. This will prevent it from soaking the soil and making it muddy. As the temperature inside the bottle rises from sunlight the water will be drawn up into the bottle. It becomes like the earth with a nice cycle of water flow just like rain. Dew will even collect on the inside top of your bottle then slowly drip down onto the plants like rain.
Why the Activated Charcoal? If you put a thin layer of charcoal (1/2 inch) in your terrarium it acts as a filter purifying the water as it flows up and down. the plants and the bacteria in the soil can cause the inside of the terrarium to get very dirty and even to rot. You can purchase this kind of charcoal at an aquarium store or any well stocked pet store.
Why the Spaghnum or Spanish Moss? this simply acts as a screen to prevent your soil from settling down into the rocks yet it allows the water to flow smoothly.
Why the Soil? This is the nutrition for the plants. They will absorb the nutrients from the soil with their roots.
Why the Moss on the top of the soil? This is just to make it look nicer! It is totally optional.
OKAY! Let's build our terrarium
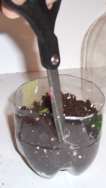
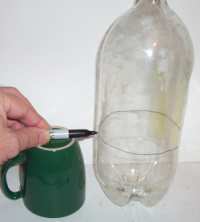 Step 1: Draw a line around the bottle about six inches up. I use a neat little trick to make a nice straight line. I rest the marker on the top of an upside down coffee cup then I rotate the 2 liter bottle. It makes a nice straight line. Step 1: Draw a line around the bottle about six inches up. I use a neat little trick to make a nice straight line. I rest the marker on the top of an upside down coffee cup then I rotate the 2 liter bottle. It makes a nice straight line.
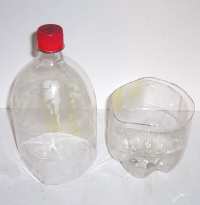
Cut the bottle along the line with a pair of scissors. You may need to start a small hole in the bottle before you can cut it with the scissors. Please ask a parent or adult to help you with this cutting of the bottle.
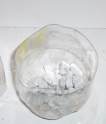
Place a handful of stones in the bottom half of the bottle. About 1-2 inches deep should be good.
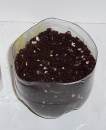
Place your other materials in the bottle. The charcoal then the moss then the soil. If you are not using charcoal or moss then put just the soil in. fill it to about 1 inch from the top.
Now Plant your seeds! You should plant 6 to 10 seeds and later as they grow you can pluck out some of the weaker ones and leave the 2 or 3 best ones.
Don't forget to water your terrarium before placing the top on. The soil should be moist but not soaked.
Now Place the top on. I recommend you squeeze the top onto the bottom so the top is on the outside.
If you have trouble fitting the two pieces together you can cut a slit about halfway down the bottom half of the bottle. this will help it close up a bit and make it easier to fit the top over it.
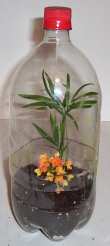
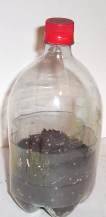
Congratulations your terrarium is completed. In a few days your seeds should germinate and in no time you will have a soda bottle terrarium that looks as nice as this one.
Taking Care of Your Soda Bottle Terrarium
There are two important factors you have to consider when it comes to your terrarium: the amount of sunlight it gets and the amount of water that is inside.
Once the plants have sprouted you should make sure it gets sunlight but do not leave it in direct sunlight for the entire day. It is a closed environment and it can get very hot inside.
Water - Look carefully at the soil in the terrarium. It should look moist but not soaked or too dry. Beads of water should form on the top inside near edge and these will drip down the sides and continue to water the soil. If it appears to be too wet you can take the top off and leave it uncovered for a day or two.
New: A new moss terrarium tutorial
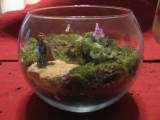
This is an attractive and easy terrarium made with moss. I show you how to make one and how to care for it. How to make a moss terrarium
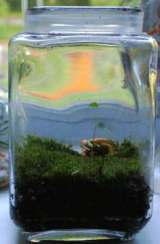 Moss Terrariums! Moss Terrariums!
Moss terrariums are wonderful in their simplicity and beauty. And you can often make one without spending a penny. Just collect up the moss from the outdoors. Add some small accents and they become a beautiful little world. I have some pictures here and a link to my tutorial on making them. Moss terrariums.
If you never made a terrarium this is a great place to start because it is easy and attractive.
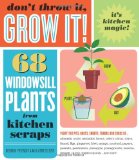 
Don't Throw It, Grow It!: 68 windowsill plants from kitchen scraps
Magic and wonder hide in unexpected places - a leftover piece of ginger, a wrinkled potato left too long in its bag, a humdrum kitchen spice rack. In Don't Throw It, Grow It! Deborah Peterson reveals the hidden possibilities in everyday foods.
Peterson, former president of the American Pit Gardening Society, shows how common kitchen staples - pits, nuts, beans, seeds, and tubers - can be coaxed into lush, vibrant houseplants that are as attractive as they are fascinating. With Peterson's help, a sweet potato turns into a blooming vine; chickpeas transform into cheery hanging baskets; the humble beet becomes a dramatic centerpiece; and gingerroot grows into a 3-foot, bamboo-like stalk. In some cases the transformation can happen overnight!
Don't Throw It, Grow It! offers growing instructions for over 50 plants in four broad categories - kitchen vegetables; fruits and nuts; herbs and spices; and more exotic plants from ethnic markets. The book is enhanced with beautiful illustrations, and its at-a-glance format makes it a quick and easy reference. Best of all, every featured plant can be grown in a kitchen, making this handy guide a must-have for avid gardeners and apartment-dwellers alike. Don't Throw It, Grow It! will appeal both to committed recyclers and to anyone who wants to find magic in the mundane - from parents and teachers looking to instill a sense of wonder in children, to the houseplant enthusiast seeking to create a one-of-a-kind Eden right in her kitchen.
|