Blacksmithing banner

Home

Home

Youtube graphic
I have a youtube channel with over 1000 Videos!

Become a Patron


Blacksmithing

Blacksmithing Lessons

Forge Stuff

Blacksmithing Projects

Resources and More Stuff

My other Subjects and websites


Will
Hi, Thanks for visiting my website. My name is Will and if you have questions
or would like to
contribute projects or ideas you can contact me Will

Make a Medieval Great helm part 7

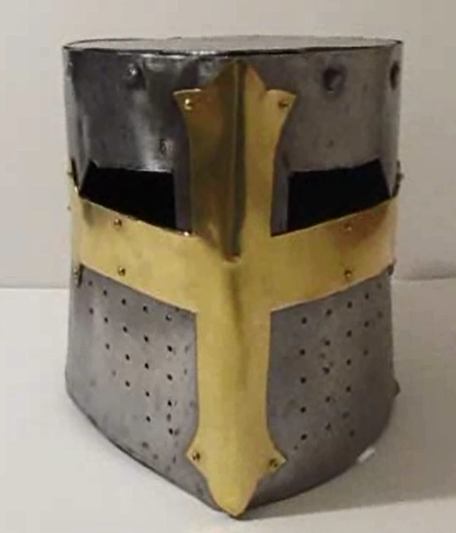
Ok! In this part of the tutorial we finish up the helmet by adding a brass ornament and breathing holes to the front of the helmet.


paper template

We are making a brass frontispiece for the helmet. But of course we don't just cut and measure the brass. We first make a few different pieces out of paper so we can look at the design and the size of it.


Trace onto brass

Once you have the shape and size just the way you want it you trace that onto your brass.

About the Brass. It comes in a lot of sizes and thicknesses. And, it will have a plastic coating on one side. That is the side that will show when you are done. The plastic coating protects it while you work on it. Before you finish installing it you peel that protective plastic right off.

Here is the exact sheet of brass that I bought for this project: 260 Brass Sheet, Unpolished (Mill) Finish, H02 Temper, ASTM B36, 0.032" Thickness, 12" Width, 12" Length, 20 Gauge

You can use a thinner brass than this if you want it easier to work with.


Cut out the brass shape

Then go ahead and cut that shape out of the brass. You can use a wide variety of tools including a shear like I have here.


detail cutting the brass

The shear is great but you can also use aircraft tin snips like this. And they are pretty good with the details.


It looks good

Ok, that brass looks good against the helmet. It is a bit thick and not easy to bend with your fingers though. And we want it to curve with the helmet.


Bend the brass

To bend the brass I put it in a vise and tap it with a mallet as needed. I cover it under and over with a cloth to protect it from damage. Bend it a bit, try it on the helmet, bend it some more and repeat until you are happy with how it fits on the helmet.

Now we are going to secure that brass to the helmet with small brass machine screws. To do that we need threaded holes in the helmet. We get those threaded holes using a process called drilling and tapping.

Drill the brass

I drilled a series of holes around the edge of the brass. These holes are large enough to pass the threads of the little brass screws but not so large that the heads of the screws pass through.


Clamp brass to helmet

Clamp the brass piece to the helmet exactly where it will sit. And using a pencil or marker mark through those holes so the helmet is marked up with the locations.

Note, you might want to do this process one hole at a time. Mark, drill and tap one hole. Put the screw in it and then do the second hole. Do this, one at a time, for all the holes.

This is because the brass is a bit tricky if it doesn't mold exactly to the steel. Doing it one hole at a time allows you to continuously adjust it as you go.


Drill the helmet

Drill out that hole with the exact right drill size for your tap. In this case I am using 4-40 screws which means I use a #43 drill.


Tap the hole

Then tap that hole out. Tapping is the process of turning a tap into the hole slowly, backing it out a little at frequent intervals. This cuts threads into the steel. Go slowly and use some kind of oil on it.


Insert the screw

Now you can go ahead and screw it down with a 4-40 screw.

Repeat this process with all the screws, securing the brass to the front of the helmet.

The final picture below shows how I put screws around the brass piece if you want to copy my pattern.


Here is a drill and tap set on amazon. It has the taps and the corresponding drill sizes. This set has the 4-40 that I use.

Vermont American 21698 13-Piece High Carbon Steel Tap and Drill Bit Set with Plastic Case


Mark for breathing holes

Now we should put some breathing holes in this helmet. I marked a grid on the helmet on both left and right cheeks. I measured these carefully because I wanted a very straight and neat pattern.


Center punch the holes

Ok, before drilling out all those holes you should center punch them carefully. This is an important step. This will get the drill to stay and drill exactly where you want it. If you are drilling breathing holes be sure to center punch them.

A center punch is a simple tool with a point on it. You place it in the right spot and hit it with a hammer. This causes a little divit in the steel.


Drill out the breathing holes

Go ahead and carefully drill those holes out. I used a 1/8 inch drill but you have a lot of leeway with the size of the holes.


That's it! Your helmet is done!

The finished helmet


Here are some other projects you might be interested in:

How to Make a Real Sword - I take you through the whole process of making a sword. And this one is a good sized sword! Really beefy and feels good in the hands. How to Make a sword


How to Make Chainmail: This is a tutorial that shows you step-by-step how to make chain mail. I show you which wire to use, how to create the rings and how to weave the actual mail. How to make chainmail. I will also be doing a tutorial on how to make a piece of chainmail armor.


Sign up for my newsletter!

Do you like making projects and exploring a variety of hobbies?

Sign up for my free newsletter. I give you regular updates on hobbies and projects you can make. it is totally free and I don't share your email with anybody.