
![]()
I have a youtube channel with over 1000 Videos!
![]()

![]()

Blacksmithing
- Blacksmithing Home
- Tools you need to get started in blacksmithing
- Introduction to Blacksmithing Part 1
- Introduction to Blacksmithing Part 2
- Making A Forge
- Make a Cheap Easy Forge.
- How to Make a Sword - an overview of the process
- Blacksmith Tools
- Blacksmithing Tips
- Safety Tips and Guidelilnes
- A look at the Anvil
- Blacksmithing Books
- Blacksmithing Pics
- Blacksmithing Videos
- Words and Definitions
- Knife Smithing and Knife Making
- My Articles
- My youtube videos
- Knife and Swordmaking tutorials
Blacksmithing Lessons
- 1-Introduction to the Anvil
- 1a-What is a blacksmith forge?
- 2-A quick look at forging
- 3-Drawing out Metal
- 4-Twisting and bending Metal
- 5-The 8 Basic Hammering Techniques
- 6-Hardy Tools
- 10-The Pritchel Hole
- 11-Tips from a Blacksmith
- 12-Blacksmith Tools
Forge Stuff
- Make a Forge
- Make a Cheap and easy forge
- Forges in Castles
- Home Made Forges
- The Atlas Knife Forge
- Whitlox Forges
- Make a Sword Forge
Blacksmithing Projects
- Great First Project: A coal and forge rake
- Make a Knife
- Forging another knife
- Forge a sword
- Make a Big Sword
- Make a Subhilt Knife
- Make a dagger
- Forge a Spear
- Make Chainmail
- Make Dragonscale Chainmail
- Dinner Bell Triangle
- Pumpkin Carving Tools
- Pritchel Hole Clamp
- Make a Fullering Tool
- Make a Hammer Hatchet
- Railroad Spike Chisel
- Planishing Stake for Armor Making
- Knights Great Helm
- Railroad Spike Knife
- Railroad Spike Throwing Axe
- Make a Push Knife
- Rebar Knife
- Make a Sword in six hours
- More Blacksmithing Projects
Resources and More Stuff
- How to Get into Blacksmithing
- What steel to use for Knifemaking
- Knifemaking Templates
- Blacksmithing Books
- Blacksmithing Coal
- Blacksmithing DVD's and movies
- Blacksmith steel coloring chart
- Blacksmithing throughout the ages
- Blacksmith Products
- Blacksmith Steel
- Some do's and don'ts from a first time knifemaker
- Knives made by web visitors
- Famous Blacksmiths
- Blacksmithing Equipment
- Blacksmith Quotes
- Blacksmith Art
- The Blacksmith Poem
- Blacksmithing Prayers
- Knife making and Sword Making Videos
- Knife Blanks
- Knife Scales
- Knife Making supplies
- Where to buy an ANVIL
- Blacksmithing FAQ
- Safety Disclaimer
My other Subjects and websites
- SWORDS
- My Medieval Blog
- Medieval Website
- Medieval Projects
- Medieval Castles
- The Knight Medieval
- Catapults

Hi, Thanks for visiting my website. My name is Will and if you have questions
or would like to
contribute projects or ideas you can contact me 
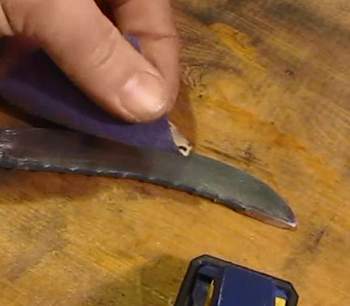
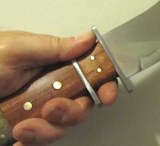 Make a subhilt knife