Understanding Miniature Scale
There are a variety of different scales that are used in fantasy miniatures and these scales have varied and changed a bit over the years. But the general rule of thumb you can use is the translation to six feet. Generally the scale given in millimeters equals six feet in real life. So in some of the more common scales of 25, 28, 30, and 35 mm each of these would represent six feet in real life. So an average human character would be about six feet and in the 25mm scale the miniature would be 25mm tall. There are ten most commonly accepted scales for miniatures and here are the eight most popular:
- 2mm scale - This is a very small scale and is often used for gaming in tight spaces or with large numbers of player pieces.
- 6.2mm scale - This is a standard size for large scale historical battles.
- 10mm - Popular scale and is equivalent to the N-Scale Railroad train which makes it a good option if you want to use many of the diorama making materials that are available in N-Scale.
- 15mm - Very popular size for historical wargamers but not used in fantasy role playing games.
- 20mm - Very popular with WWII Wargamers and is equivalent to the HO Model Railroad scale which gives a lot of options for purchasing diorama materials made for railroad models.
- 25/28mm - This is the most popular size for fantasy gamers and is equivalent to the OO Scale in railroading. It's my favorite scale for dioramas and there are lots of railroad diorama making supplies that fit this scale. This book uses this scale in the tutorials.
- 30mm - Older scale and not used very much in modern times. It is a good match for S Scale model railroads.
- 54 mm - This scale is generally used for collectible figures; and miniatures in this size are often very detailed and well crafted. This size of miniature is often used in dioramas that specifically showcase one or just a few items. The goal of a diorama with this scale is more to highlight a specific piece or two rather than to build a complete landscape. This scale is a very close match to models in the 1:35 scale.
Translating millimeters to inches
One inch = 25.4 millimeters so it is easy to get a sense for how large a humanoid figure would be in these various scales. In the 25/28mm scale a human would be about 1 inch tall which equals 6 feet in size. In the 54mm scale a humanoid would be a little over two inches tall which equals 6 feet in size.
A couple of important things to think about when considering scale.
When making a diorama you should always stay within the same scale for that diorama. This will insure it looks real. If you were to use humanoids in the 25/28mm scale and then use horse in the 10mm scale they wouldn't look right. The horse would be about the size of a big dog. So no matter which scale you use just stay within it.
Scales effect on size, detail and cost of your diorama
The scale you use for your diorama will have an impact on the size of your diorama, the cost of it and the level of detail you can achieve. And to illustrate this let's consider a simple scene of a hunter standing next to his stone house. Let's picture a hunter in real life. He is standing outside the stone house he built. It is a single room stone building with a fireplace, bunk, table etc. In our minds eye we picture this house being about eighteen feet wide by eighteen feet deep and about twelve feet in height.
In the 25/28mm scale where 1 inch equals six feet the hut, when built for your diorama, would be about 3 inches wide, 3 inches deep and about two inches tall. This would make it look realistic and in scale to your Hunter miniature.
If you used a miniature in the 54mm scale the hut would be about 6.3 inches wide, 6.3 inches deep and about 4 inches tall.
With the larger scale the diorama would be twice as large which is an important consideration and it will probably be more expensive. But you will be able to make it with significantly more detail - it will look much more realistic. So this is the trade off you have to consider when choosing a scale.
I find the 25/28mm scale to be the best for my goals. It gives enough detail to be realistic, there are lots of miniatures available, and it is small enough so that I can make large dioramas that have a lot of detail and cover a lot of terrain.
Create Mock-ups to help you see the scale

A very simple technique that I use before I start building a diorama is to create some quick and easy mock-ups using paper or cardboard. I make some of the major structures so I can place them with the miniatures and see if they look right.
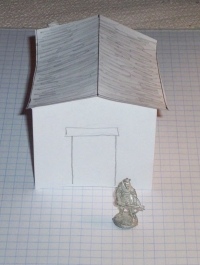
The picture shown here uses the example of the hunter and his stone shack. By doing this you can get a quick feel for the scale of things in your future diorama and you also have a great way to arrange the different components of your diorama.
A paper mock-up of a hunter and his stone hut
Graph paper is also a very handy tool to use at this stage of diorama making. It allows you to easily get a measurement on the size, scale, and relationship of objects in your diorama. This will come in handy later in the process when you start making the real diorama.

Make miniature birds
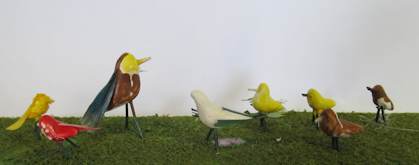
This is a quick and easy tutorial on how to make tiny little birds with just a few basic supplies like air dry crayola clay or FIMO How to Make miniature birds

Make a cheap and easy spray booth for painting your miniatures and models
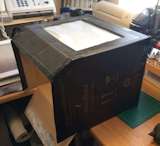
You just need a few basic supplies and a small computer fan and you are have yourself a nice little spray booth. This terrific project was submitted by a web visitor. How to make a cardboard Spray paint booth.
|
![]()


