
![]()
I have a youtube channel with over 1000 Videos!
![]()

Terrarium Projects
- Terrarium Home
- Terrarium Store
- Terrarium Basics
- Terrrarium Plants
- Terrarium Videos
- Terrarium Books
- 1 hour Terrarium
- Frog Terrariums
- Dish Terrarium
- Bottle Terrarium
- Large Glass Terrarium
- Creative Terrariums
- Terrarium Plants
- Soda Bottle Terrarium
- A beautiful Terrarium in one Hour!
- Venus Fly Traps
- Make a carnivorous terrarium
- Terrarium Design basics
- Make a Micro Terrarium
- Terrarium Animals
- Pickle Jar Terrarium
- Wine Glass Terrarium
- Conch Shell Terrarium
- Terrariums for Kids
- Desert Terrarium
- Moss Terrarium
- Apothecary Jar Terrariums
- Submitted terrarium Pics
- A terrarium as a learning tool for kids
- Single Plant zen Terrariums
- Terrariums as Art
- Polymer Clay figures in your terrarium
- Big Glass terrariums
- Tips on making a glass terrarium
- How to make a terrarium waterfall
- Pet Terrariums
- words,terms, definitions
- Terrarium Accents
- How to grow mushrooms
- Paludarium
- History of the Terrarium
- Make a Terrarium out of an old Fish Tank
- Air Plant Terrarium
- Terrarium Ideas
- Michelles Vivariums -including tips on making vivariums
- Dealing with Mold in a terrarium
- Transplanting dying plants in your terrarium
- Make a terrarium? Send me your pics!
- Terrarium FAQ
Get Will's Kindle Book:
MORE
- Mini Egg Terrariums
- The smallest flowers in the world! Micro Mini Sinningia
- Terrarium Kits
- Need a terrarium?
- Terrarium Books
- Exotic terrariums
- Small Glass terrarium bowls
- Exo-terra-terrariums for pets and lizards
- Carnivorous Terrariums, plants and books
- Terrarium Moss
- Wardian Cases
- Terrarium Containers
- Terrarium Backgrounds
- Cactus and Succulents
- Glass Containers for Terrariums for Kids
- DuneCraft Terrariums
- New: Low Light Terrarium Plants
- Fountains and pumps for your terrarium or vivarium
- Micro Terrariums
- Terrarium Sand
- Magic Plants
- Turtle Terrariums
- Terrarium Gifts
- Terrarium Waterfalls & Pumps
- Cloche terrariums
- Terrariums for Frogs
- How to feed a venus flytrap
- Twig Terrariums
- Reptile Terrarium Supplies and Kits
- Terrarium Links
- Terrarium Charcoal
- Moss Terrarium Tips and Guidelines -
My other Subjects
- Beekeeping
- Blacksmithing
- Bonsai
- Catapults
- Classical Guitar
- Dioramas
- Fantasy Art School
- For Writers
- Goldfish
- Leathercrafting
- Military Dioramas
- Mead Making
- Miniatures
- Model Rockets
- Nature projects
- Origami
- Paper Making
- Paper Games
- Paper Projects
- Science Projects
- Stained Glass
- Stamp Collecting
- Tatebanko
- Trebuchets
More Stuff
- The Creativity of it
- Products/Tools
- Press/Media kit
- Contribute to my Website
- Privacy Policy
- About
- Contact

Hi, Thanks for visiting my website. My name is Will and if you have questions
or would like to
contribute projects or ideas you can contact me 
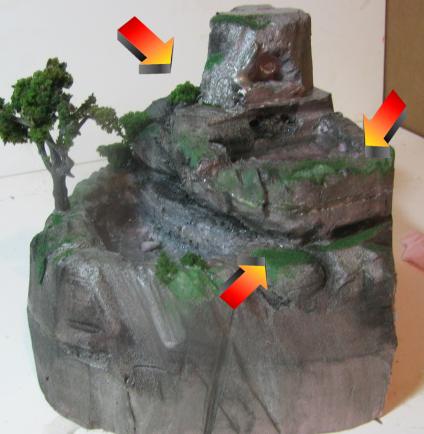
 Make a Hobbit Terrarium
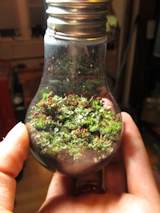 Make a Light Bulb Terrarium