The plant in the terrarium is Hoya wallichii, which needs high humidity. I tried first to rise the humidity inside by warming the water with an aquarium heater, but it didn't raise the humidity enough. Now I replaced it with an air pump, and it works fine. It also circulates the air, so I don't need a fan for that.
A really wonderful thing about this project is that it shows persistence and observation which is something you really need to cultivate if you are taking care of terrariums. After she made this project she monitored it and adjusted it as needed. You should do this too! It is a living thing and a process so it is quite alright to modify it over time.
Terrarium for one plant:
What you'll need:
acid resisting nuts, bolts and washers 1,20€
80 cm x 100 cm (about 48 x 32 inches) piece of clear polycarbonate (pc), 1mm thick 19€
Tools:
drill + bit
1m long board (1 yard)
marker
measuring tape
(small round file, if the holes don't just match)
vacuum cleaner
Do like i say, not like i do:
When you buy the polycarbonate sheets it will come with a thin plastic covering on each side. Yo should leave this plastic protective covering on it while you are building your terrarium. It will protect it from scratches while you are working on it. Remove the protective plastics from the pc just when you're done, not before. Otherwise it'll have scratches and sawdust all over in no time.
If you make one that's different size than mine: Don't do the first version out of polycarbonate, but out of paper or cardboard or what ever you have at hand. This will make your life a lot easier, when the final product isn't too small and possible ventilating holes and access windows are in the right places. I wouldn't do a terrarium with smaller diameter (<100cm) with 1mm thick pc, since it is quite stiff.
*****
I made this without instructions and now i know how I should have done it:
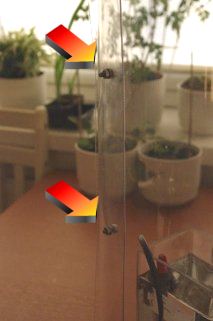 Measure and mark (to that 80cm long edge) the places of the holes for the nuts (Note: make the markings to the pc, not in the protective plastic, it moves). Leave 2 cm to the edges so that the pvc doesn't break when you put the nuts in place. Good spacing for the nuts is about 10-15 cm. Longer spaces allow the pc to undulate too much. Put the pc on the board, so that you wont drill the floor. Keep the pc on place so it doesn't move on the board and drill the holes. Turn the pc and use the board as a template for the other side. Mark the holes and drill. I used a piece of corner molding i found at the attic. It made it easier to keep the pc at place.
If you want to make holes for ventilation or maintanence, this is a good time for that.
Now you can assemble the terrarium and put the nuts and bolts to their places. Start with the first and the last, it'll make it easier to get the middle ones in. Finally remove the protective sheets. Ready! (I still need to buy more nuts and bolts. I already made the holes for them, so now i just have to find the time to go shopping.)
Making the Heater/Humidifier
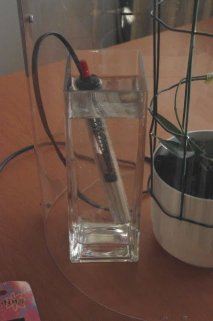 I still don't know much about how the technique will work, but i'll soon find out. Heater/humidifier is a glass vase with water and aquarium heater. I made the fan from a computer fan and a Nokia cell phone charger. Lighting is from store downstairs.

Trellis is piece of outdoor fencing, and i attached the plant to it with small hair accessories. As a hindsight i should have bought a bit higher fence and make it start from the bottom of the pot. Now as the plant grows, it's weight can become a problem.
The final result doesn't look ugly to me. This is light weight and doesn't break if it falls. If i don't need it anymore, i can store it flat. I'll test how high the humidity will rise and if it doesn't, i'll have to make a roof to this.
Now that i've tried this "in action", some findings:
Acryl might have been better choice for material as it doesn't get scratces so easily. With the heater and roof, the temperature rose only 4 degrees Celsius higher than the room temperature. I had to add roof to keep the moisture in, which added 2,70€ to my budget. With the roof the moisture stays at 75% without the heater or vase with water in side, so i took them off. Now i only have lighting and the fan in, and the plant loves to grow.
The plant in the terrarium is Hoya wallichii, which needs high humidity. I tried first to rise the humidity inside by warming the water with an aquarium heater, but it didn't rise the humidity enough. Now I replaced it with an air pump, and it works fine. It also circulates the air, so I don't need a fan for that. The temperature inside is just about the same as the room temperature, so this doesn't keep heat very well, not even if i cover the top with plastic.
Some thoughts about making this so the temperature will be higher inside. You can create a total enclosure out of the polycarbonate which includes the top and the bottom. And you can even seal all the edges with some kind of a silicon caulk. Monitor the temperature and drill small holes in it to get the temperature just right. And, don't caulk the top. This should act as a lid that you can easily remove when needed.
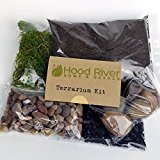
Premium Kit for Small Terrarium (Succulent, Cactus, and Fairy Garden)
Perfect kit for a first time terrarium gardener or to give as a gift. Provides the exact amount of the specific "ingredients" necessary to build a thriving small terrarium. Will work for closed terrariums, open terrariums, fairy gardens, as well as with succulents and cactii. Kit includes terrarium potting soil, activated charcoal, two different sizes of semi-polished river rocks, shag moss, and complete but easy to follow step-by-step instructions. The ingredients supplied are in the following approximate amounts: 9 oz. soil; 8 oz. small river rocks; 8 oz. larger river rocks; 1 oz. activated charcoal; 1 oz. sheet moss. Great for anyone wanting to set up a terrarium without having to go and find all the different pieces separately. Please note that the kit does NOT include a container or plants. Please also note that this kit is for a SMALL terrarium. We recommend using a mason jar if you are making a closed terrarium or a container with a 4 - 6" diameter if you are making a succulent or cactus terrarium.